Create a Workload Cluster
Once created and accepted, you should see the servers that make up your ServerClasses appear as “available”:
$ kubectl get serverclass
NAME      AVAILABLE                                  IN USE
any       ["00000000-0000-0000-0000-d05099d33360"]   []
Generate Cluster Manifests
We are now ready to generate the configuration manifest templates for our first workload cluster.
There are several configuration parameters that should be set in order for the templating to work properly:
CONTROL_PLANE_ENDPOINT: The endpoint used for the Kubernetes API server (e.g.https://1.2.3.4:6443). This is the equivalent of theendpointyou would specify intalosctl gen config. There are a variety of ways to configure a control plane endpoint. Some common ways for an HA setup are to use DNS, a load balancer, or BGP. A simpler method is to use the IP of a single node. This has the disadvantage of being a single point of failure, but it can be a simple way to get running.CONTROL_PLANE_SERVERCLASS: The server class to use for control plane nodes.WORKER_SERVERCLASS: The server class to use for worker nodes.KUBERNETES_VERSION: The version of Kubernetes to deploy (e.g.v1.21.1).CONTROL_PLANE_PORT: The port used for the Kubernetes API server (port 6443)
For instance:
export CONTROL_PLANE_SERVERCLASS=any
export WORKER_SERVERCLASS=any
export TALOS_VERSION=v0.13.3
export KUBERNETES_VERSION=v1.22.2
export CONTROL_PLANE_PORT=6443
export CONTROL_PLANE_ENDPOINT=1.2.3.4

clusterctl generate cluster cluster-0 -i sidero > cluster-0.yaml
Take a look at this new cluster-0.yaml manifest and make any changes as you
see fit.
Feel free to adjust the replicas field of the TalosControlPlane and MachineDeployment objects to match the number of machines you want in your controlplane and worker sets, respecively.
MachineDeployment (worker) count is allowed to be 0.
Of course, these may also be scaled up or down after they have been created, as well.
Create the Cluster
When you are satisfied with your configuration, go ahead and apply it to Sidero:
kubectl apply -f cluster-0.yaml
At this point, Sidero will allocate Servers according to the requests in the cluster manifest. Once allocated, each of those machines will be installed with Talos, given their configuration, and form a cluster.
You can watch the progress of the Servers being selected:
watch kubectl --context=sidero-demo \
  get servers,machines,clusters
First, you should see the Cluster created in the Provisioning phase.
Once the Cluster is Provisioned, a Machine will be created in the
Provisioning phase.
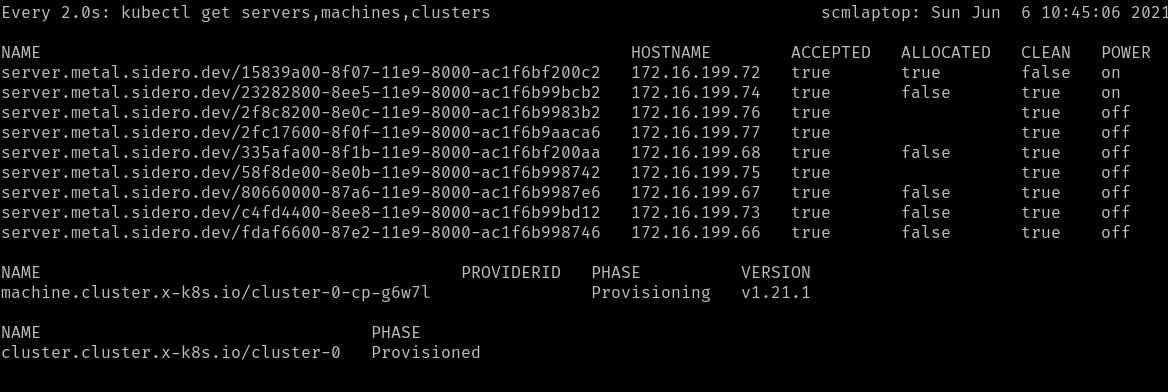
During the Provisioning phase, a Server will become allocated, the hardware
will be powered up, Talos will be installed onto it, and it will be rebooted
into Talos.
Depending on the hardware involved, this may take several minutes.
Eventually, the Machine should reach the Running phase.
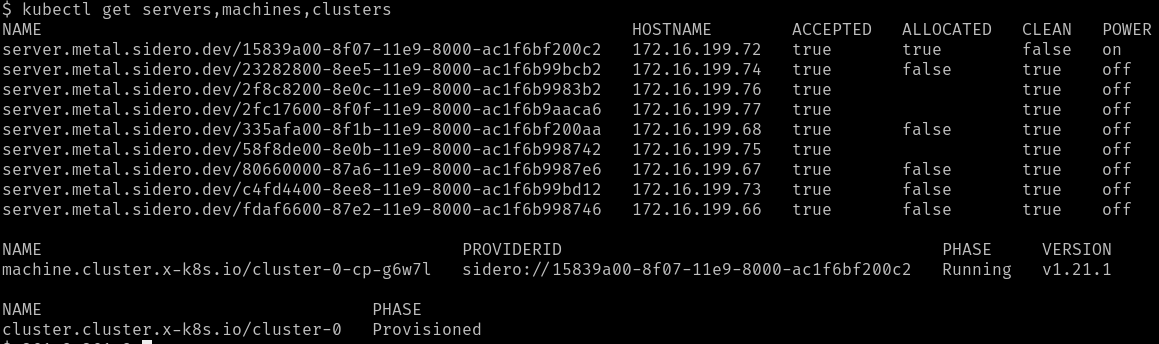
The initial controlplane Machine will always be started first. Any additional nodes will be started after that and will join the cluster when they are ready.
Retrieve the Talosconfig
In order to interact with the new machines (outside of Kubernetes), you will
need to obtain the talosctl client configuration, or talosconfig.
You can do this by retrieving the resource of the same type from the Sidero
management cluster:
kubectl --context=sidero-demo \
  get talosconfig \
  -l cluster.x-k8s.io/cluster-name=cluster-0 \
  -o jsonpath='{.items[0].status.talosConfig}' \
  > cluster-0-talosconfig.yaml
Retrieve the Kubeconfig
With the talosconfig obtained, the workload cluster’s kubeconfig can be retrieved in the normal Talos way:
talosctl --talosconfig cluster-0.yaml kubeconfig
Check access
Now, you should have two cluster available: you management cluster
(sidero-demo) and your workload cluster (cluster-0).
kubectl --context=sidero-demo get nodes
kubectl --context=cluster-0 get nodes