This is the multi-page printable view of this section.
Click here to print.
Return to the regular view of this page.
Welcome
Welcome to the Sidero Metal documentation.
:warning: Sidero Labs is no longer actively developing Sidero Metal.
For an alternative, please see Omni
and the Bare-Metal Infrastructure Provider.
Unless you have an existing support contract covering Sidero Metal, all support will be provided by the community (including questions in our Slack workspace).
1 - Overview
1.1 - Introduction
Sidero (“Iron” in Greek) is a project created by the Sidero Labs team.
Sidero Metal provides lightweight, composable tools that can be used to create bare-metal Talos Linux + Kubernetes clusters.
These tools are built around the Cluster API project.
Because of the design of Cluster API, there is inherently a “chicken and egg” problem: you need an existing Kubernetes cluster in order to provision the management plane, that can then provision more clusters.
The initial management plane cluster that runs the Sidero Metal provider does not need to be based on Talos Linux - although it is recommended for security and stability reasons.
The Getting Started guide will walk you through installing Sidero Metal either on an existing cluster, or by quickly creating a docker based cluster used to bootstrap the process.
Overview
Sidero Metal is currently made up of two components:
- Metal Controller Manager: Provides custom resources and controllers for managing the lifecycle of metal machines, iPXE server, metadata service, and gRPC API service
- Cluster API Provider Sidero (CAPS): A Cluster API infrastructure provider that makes use of the pieces above to spin up Kubernetes clusters
Sidero Metal also needs these co-requisites in order to be useful:
All components mentioned above can be installed using Cluster API’s clusterctl tool.
See the Getting Started for more details.
1.2 - What's New
Resources under metal.sidero.dev (Server, ServerClass, Environment) now have a new version v1alpha2.
Old version v1alpha1 is still supported, but it is recommended to update templates to use the new resource version.
Server Changes
Hardware information was restructured and extended when compared with v1alpha1:
.spec.systemInformation -> .spec.hardware.system.spec.cpu -> .spec.hardware.compute.processors[]
ServerClass Changes
.spec.qualifiers.systemInformation -> .spec.qualifiers.system.spec.qualifiers.cpu -> .spec.qualifiers.hardware.compute.processors[]
Sidero Metadata Server no longer depends on the version of Talos machinery library it is built with.
Sidero should be able to process machine config for future versions of Talos.
Sidero Agent
Sidero Agent now runs DHCP client in the userland, on the link which was used to PXE boot the machine.
This allows to run Sidero Agent on the machine with several autoconfigured network interfaces, when one of them is used for the management network.
DHCP Proxy
Sidero Controller Manager now includes DHCP proxy which augments DHCP response with additional PXE boot options.
When enabled, DHCP server in the environment only handles IP allocation and network configuration, while DHCP proxy
provides PXE boot information automatically based on the architecture and boot method.
1.3 - Installation
To install Sidero and the other Talos providers, simply issue:
clusterctl init -b talos -c talos -i sidero
Sidero supports several variables to configure the installation, these variables can be set either as environment
variables or as variables in the clusterctl configuration:
SIDERO_CONTROLLER_MANAGER_HOST_NETWORK (false): run sidero-controller-manager on host networkSIDERO_CONTROLLER_MANAGER_DEPLOYMENT_STRATEGY (RollingUpdate): strategy to use when updating sidero-controller-manager, use Recreate when using a single node and SIDERO_CONTROLLER_MANAGER_HOST_NETWORK is trueSIDERO_CONTROLLER_MANAGER_API_ENDPOINT (empty): specifies the IP address controller manager API service can be reached on, defaults to the node IP (TCP)SIDERO_CONTROLLER_MANAGER_API_PORT (8081): specifies the port controller manager can be reached onSIDERO_CONTROLLER_MANAGER_CONTAINER_API_PORT (8081): specifies the controller manager internal container portSIDERO_CONTROLLER_MANAGER_SIDEROLINK_ENDPOINT (empty): specifies the IP address SideroLink Wireguard service can be reached on, defaults to the node IP (UDP)SIDERO_CONTROLLER_MANAGER_SIDEROLINK_PORT (51821): specifies the port SideroLink Wireguard service can be reached onSIDERO_CONTROLLER_MANAGER_EXTRA_AGENT_KERNEL_ARGS (empty): specifies additional Linux kernel arguments for the Sidero agent (for example, different console settings)SIDERO_CONTROLLER_MANAGER_AUTO_ACCEPT_SERVERS (false): automatically accept discovered servers, by default .spec.accepted should be changed to true to accept the serverSIDERO_CONTROLLER_MANAGER_AUTO_BMC_SETUP (true): automatically attempt to configure the BMC with a sidero user that will be used for all IPMI tasks.SIDERO_CONTROLLER_MANAGER_INSECURE_WIPE (true): wipe only the first megabyte of each disk on the server, otherwise wipe the full diskSIDERO_CONTROLLER_MANAGER_SERVER_REBOOT_TIMEOUT (20m): timeout for the server reboot (how long it might take for the server to be rebooted before Sidero retries an IPMI reboot operation)SIDERO_CONTROLLER_MANAGER_IPMI_PXE_METHOD (uefi): IPMI boot from PXE method: uefi for UEFI boot or bios for BIOS bootSIDERO_CONTROLLER_MANAGER_BOOT_FROM_DISK_METHOD (ipxe-exit): configures the way Sidero forces server to boot from disk when server hits iPXE server after initial install: ipxe-exit returns iPXE script with exit command, http-404 returns HTTP 404 Not Found error, ipxe-sanboot uses iPXE sanboot command to boot from the first hard disk (can be also configured on ServerClass/Server method)SIDERO_CONTROLLER_MANAGER_DISABLE_DHCP_PROXY (false): disable DHCP Proxy service (enabled by default)SIDERO_CONTROLLER_MANAGER_EVENTS_NEGATIVE_ADDRESS_FILTER (empty): negative filter for reported machine addresses (e.g. 10.0.0.0/8 won’t publish any 10.x addresses to the MetalMachine status)
Sidero provides four endpoints which should be made available to the infrastructure:
- UDP port 67 for the proxy DHCP service (providing PXE boot information to the nodes, but no IPAM)
- TCP port 8081 which provides combined iPXE, metadata and gRPC service (external endpoint should be specified as
SIDERO_CONTROLLER_MANAGER_API_ENDPOINT and SIDERO_CONTROLLER_MANAGER_API_PORT) - UDP port 69 for the TFTP service (DHCP server should point the nodes to PXE boot from that IP)
- UDP port 51821 for the SideroLink Wireguard service (external endpoint should be specified as
SIDERO_CONTROLLER_MANAGER_SIDEROLINK_ENDPOINT and SIDERO_CONTROLLER_MANAGER_SIDEROLINK_PORT)
These endpoints could be exposed to the infrastructure using different strategies:
- running
sidero-controller-manager on the host network. - using Kubernetes load balancers (e.g. MetalLB), ingress controllers, etc.
Note: If you want to run sidero-controller-manager on the host network using port different from 8081 you should set both SIDERO_CONTROLLER_MANAGER_API_PORT and SIDERO_CONTROLLER_MANAGER_CONTAINER_API_PORT to the same value.
1.4 - Architecture
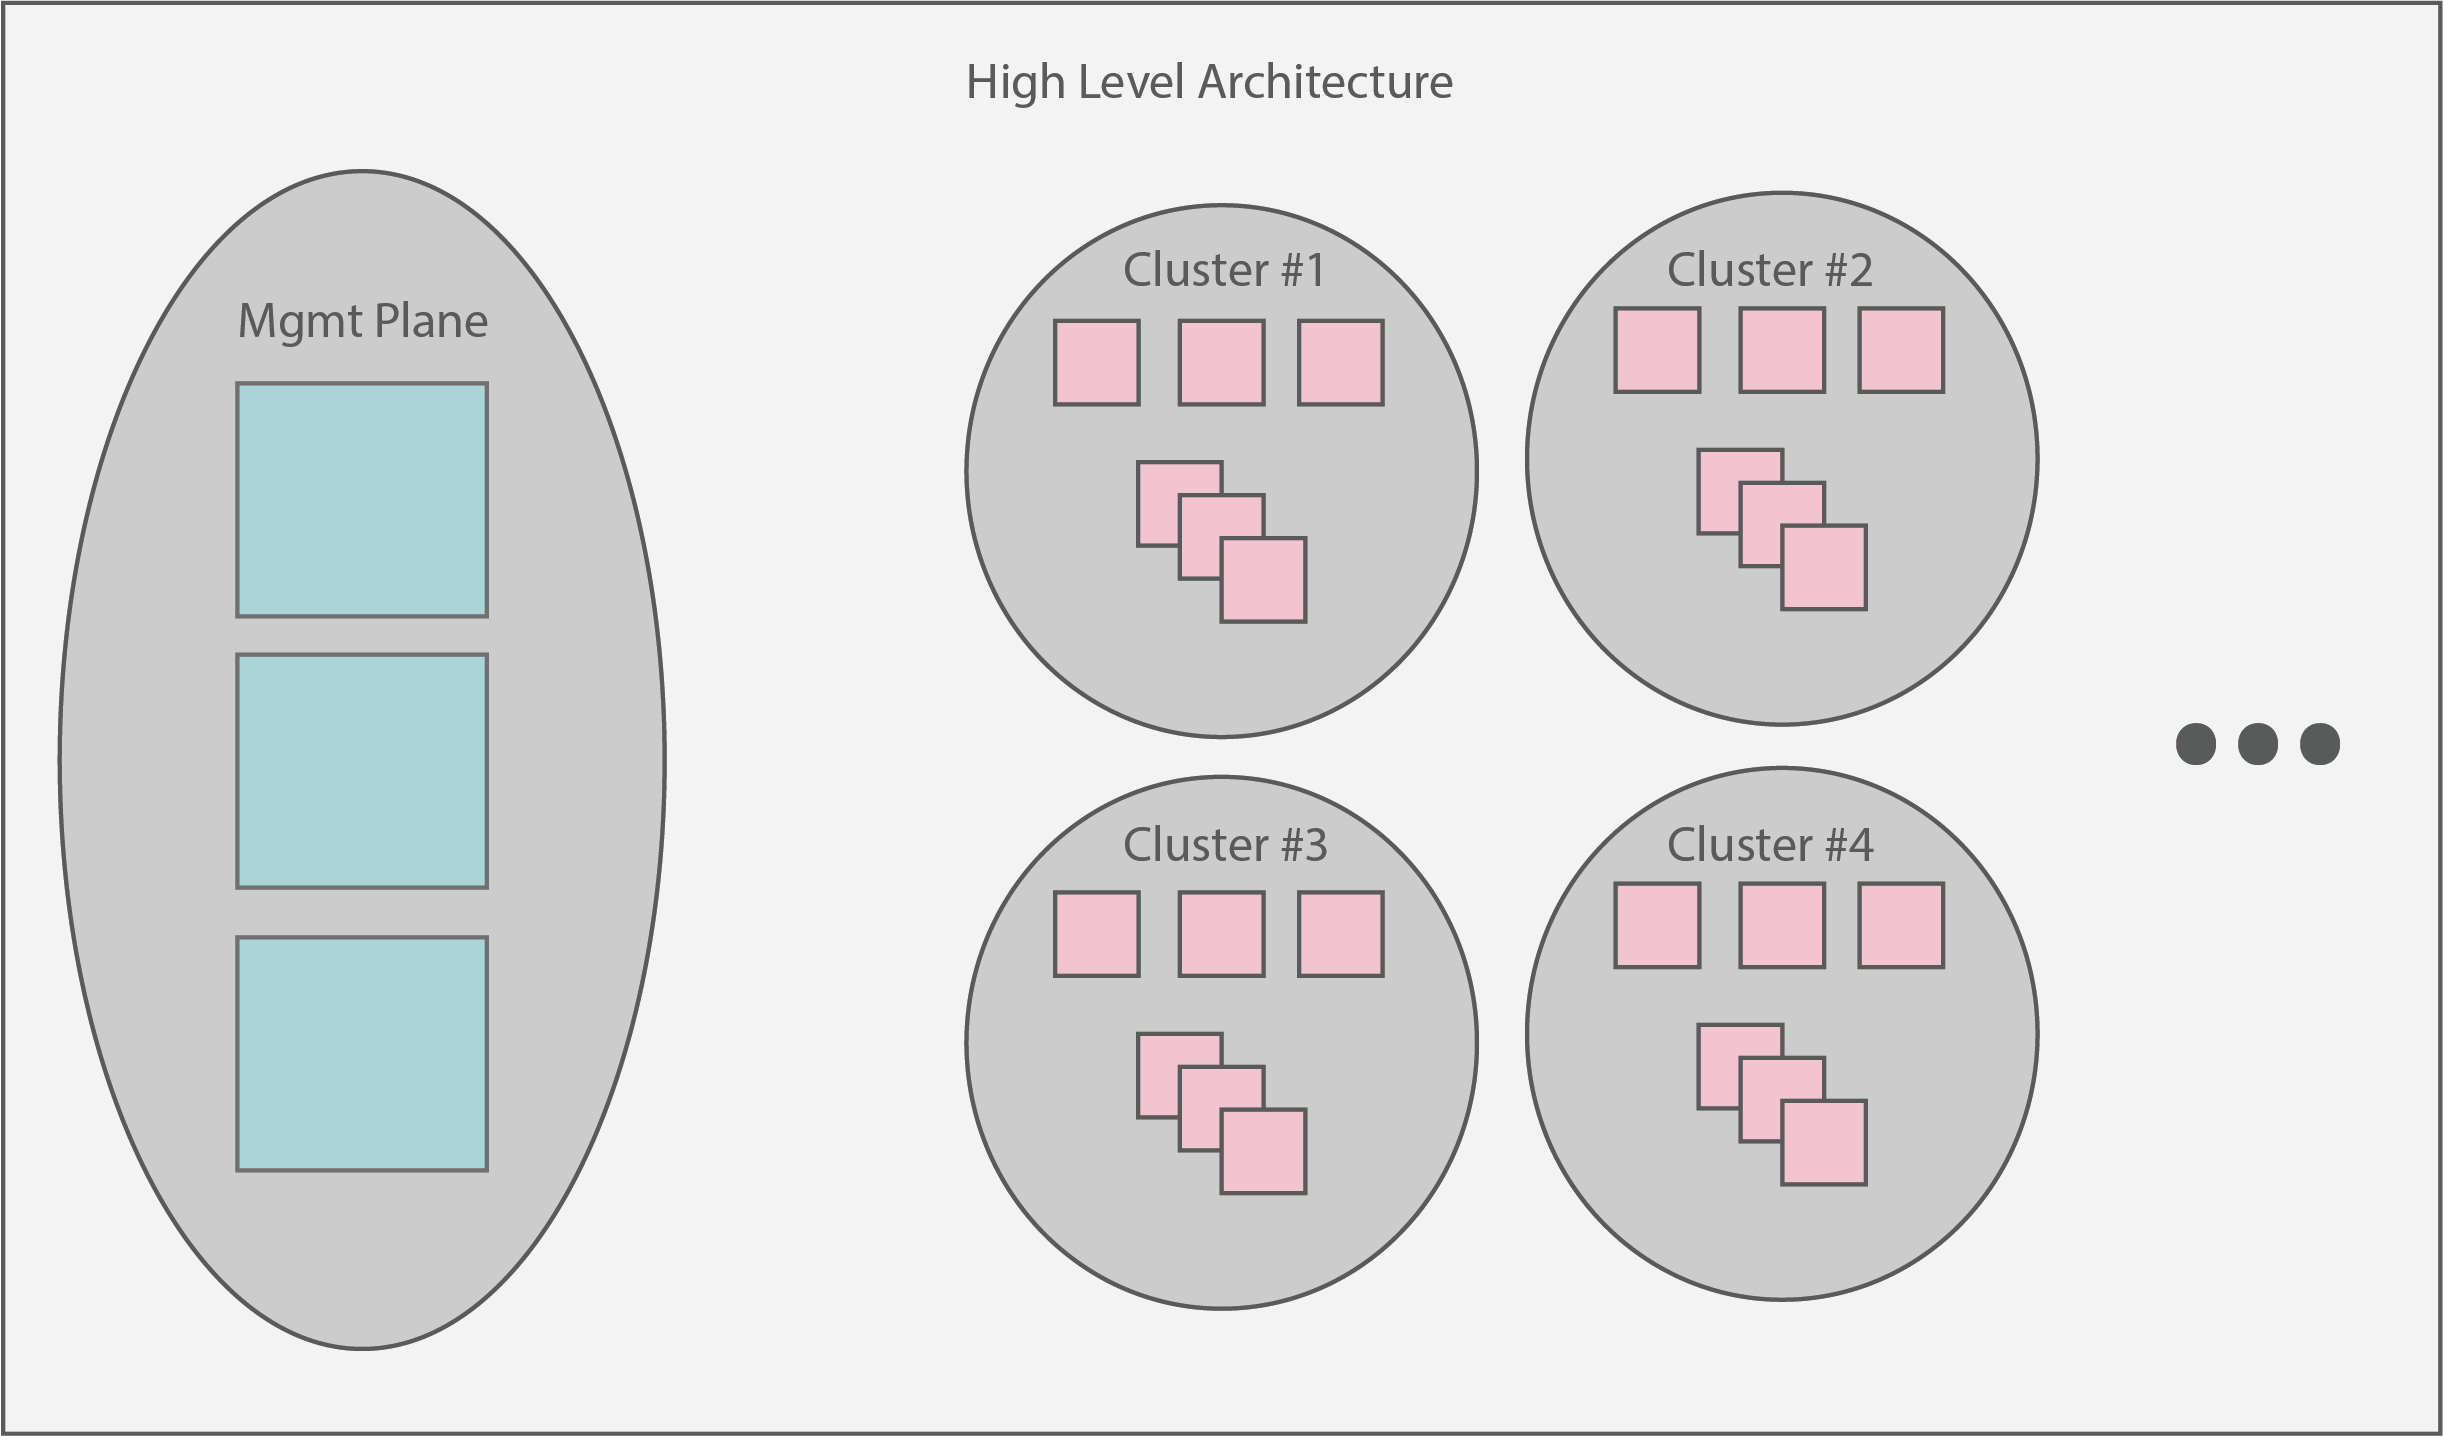
The overarching architecture of Sidero centers around a “management plane”.
This plane is expected to serve as a single interface upon which administrators can create, scale, upgrade, and delete Kubernetes clusters.
At a high level view, the management plane + created clusters should look something like:
1.5 - SideroLink
SideroLink provides an overlay Wireguard point-to-point connection from every Talos machine to the Sidero.
Sidero provisions each machine with a unique IPv6 address and Wireguard key for the SideroLink connection.
Note: SideroLink is only supported with Talos >= 0.14.
SideroLink doesn’t provide a way for workload machines to communicate with each other, a connection is only
point-to-point.
SideroLink connection is both encrypted and authenticated, so Sidero uses that to map data streams coming from the machines
to a specific ServerBinding, MetalMachine, Machine and Cluster.
Talos node sends two streams over the SideroLink connection: kernel logs (dmesg) and Talos event stream.
SideroLink is enabled automatically by Sidero when booting Talos.
Kernel Logs
Kernel logs (dmesg) are streamed in real time from the Talos nodes to the sidero-controller-manager over SideroLink connection.
Log streaming starts when the kernel passes control to the init process, so kernel boot time logs will only be available when control
is passed to the userland.
Logs can be accessed by accessing the logs of the serverlogs container of the sidero-controller-manager pod:
$ kubectl -n sidero-system logs deployment/sidero-controller-manager -c serverlogs -f
{"clock":8576583,"cluster":"management-cluster","facility":"user","machine":"management-cluster-cp-ddgsw","metal_machine":"management-cluster-cp-vrff4","msg":"[talos] phase mountState (6/13): 1 tasks(s)\n","namespace":"default","priority":"warning","seq":665,"server_uuid":"6b121f82-24a8-4611-9d23-fa1a5ba564f0","talos-level":"warn","talos-time":"2022-02-11T12:42:02.74807823Z"}
...
The format of the message is the following:
{
    "clock": 8576583,
    "cluster": "management-cluster",
    "facility": "user",
    "machine": "management-cluster-cp-ddgsw",
    "metal_machine": "management-cluster-cp-vrff4",
    "msg": "[talos] phase mountState (6/13): 1 tasks(s)\n",
    "namespace": "default",
    "priority": "warning",
    "seq": 665,
    "server_uuid": "6b121f82-24a8-4611-9d23-fa1a5ba564f0",
    "talos-level": "warn",
    "talos-time": "2022-02-11T12:42:02.74807823Z"
}
Kernel fields (see Linux documentation for details):
clock is the kernel timestamp relative to the boot timefacility of the messagemsg is the actual log messageseq is the kernel log sequencepriority is the message priority
Talos-added fields:
talos-level is the translated priority into standard logging levelstalos-time is the timestamp of the log message (accuracy of the timestamp depends on time sync)
Sidero-added fields:
server_uuid is the name of the matching Server and ServerBinding resourcesnamespace is the namespace of the Cluster, MetalMachine and Machinecluster, metal_machine and machine are the names of the matching Cluster, MetalMachine and Machine resources
It might be a good idea to send container logs to some log aggregation system and filter the logs for a cluster or a machine.
Quick filtering for a specific server:
kubectl -n sidero-system logs deployment/sidero-controller-manager -c serverlogs | jq -R 'fromjson? | select(.server_uuid == "b4e677d9-b59b-4c1c-925a-f9d9ce049d79")'
Talos Events
Talos delivers system events over the SideroLink connection to the sidero-link-manager pod.
These events can be accessed with talosctl events command.
Events are mostly used to update ServerBinding/MetalMachine statuses, but they can be also seen in the logs of the serverevents container:
$ kubectl -n sidero-system logs deployment/sidero-controller-manager -c serverevents -f
{"level":"info","ts":1644853714.2700942,"caller":"events-manager/adapter.go:153","msg":"incoming event","component":"sink","node":"[fdae:2859:5bb1:7a03:3ae3:be30:7ec4:4c09]:44530","id":"c857jkm1jjcc7393cbs0","type":"type.googleapis.com/machine.
AddressEvent","server_uuid":"b4e677d9-b59b-4c1c-925a-f9d9ce049d79","cluster":"management-cluster","namespace":"default","metal_machine":"management-cluster-cp-47lll","machine":"management-cluster-cp-7mpsh","hostname":"pxe-2","addresses":"172.25.0.5"}
Sidero updates the statuses of ServerBinding/MetalMachine resources based on the events received from Talos node:
- current addresses of the node
- statuses of machine configuration loading and validation, installation status
See Resources for details.
SideroLink State
State of the SideroLink connection is kept in the ServerBinding resource:
spec:
  siderolink:
    address: fdae:2859:5bb1:7a03:3ae3:be30:7ec4:4c09/64
    publicKey: XIBT49g9xCoBvyb/x36J+ASlQ4qaxXMG20ZgKbBbfE8=
Installation-wide SideroLink state is kept in the siderolink Secret resource:
$ kubectl get secrets siderolink -o yaml
apiVersion: v1
data:
  installation-id: QUtmZGFmVGJtUGVFcWp0RGMzT1BHSzlGcmlHTzdDQ0JCSU9aRzRSamdtWT0=
  private-key: ME05bHhBd3JwV0hDczhNbm1aR3RDL1ZjK0ZSUFM5UzQwd25IU00wQ3dHOD0=
...
Key installation-id is used to generate unique SideroLink IPv6 addresses, and private-key is the Wireguard key of Sidero.
1.6 - Resources
Sidero, the Talos bootstrap/controlplane providers, and Cluster API each provide several custom resources (CRDs) to Kubernetes.
These CRDs are crucial to understanding the connections between each provider and in troubleshooting problems.
It may also help to look at the cluster template to get an idea of the relationships between these.
Cluster API (CAPI)
It’s worth defining the most basic resources that CAPI provides first, as they are related to several subsequent resources below.
Cluster
Cluster is the highest level CAPI resource.
It allows users to specify things like network layout of the cluster, as well as contains references to the infrastructure and control plane resources that will be used to create the cluster.
Machines
Machine represents an infrastructure component hosting a Kubernetes node.
Allows for specification of things like Kubernetes version, as well as contains reference to the infrastructure resource that relates to this machine.
MachineDeployments
MachineDeployments are similar to a Deployment and their relationship to Pods in Kubernetes primitives.
A MachineDeployment allows for specification of a number of Machine replicas with a given specification.
Cluster API Bootstrap Provider Talos (CABPT)
TalosConfigs
The TalosConfig resource allows a user to specify the type (init, controlplane, join) for a given machine.
The bootstrap provider will then generate a Talos machine configuration for that machine.
This resource also provides the ability to pass a full, pre-generated machine configuration.
Finally, users have the ability to pass configPatches, which are applied to edit a generate machine configuration with user-defined settings.
The TalosConfig corresponds to the bootstrap sections of Machines, MachineDeployments, and the controlPlaneConfig section of TalosControlPlanes.
TalosConfigTemplates
TalosConfigTemplates are similar to the TalosConfig above, but used when specifying a bootstrap reference in a MachineDeployment.
Cluster API Control Plane Provider Talos (CACPPT)
TalosControlPlanes
The control plane provider presents a single CRD, the TalosControlPlane.
This resource is similar to MachineDeployments, but is targeted exclusively for the Kubernetes control plane nodes.
The TalosControlPlane allows for specification of the number of replicas, version of Kubernetes for the control plane nodes, references to the infrastructure resource to use (infrastructureTemplate section), as well as the configuration of the bootstrap data via the controlPlaneConfig section.
This resource is referred to by the CAPI Cluster resource via the controlPlaneRef section.
Sidero
Cluster API Provider Sidero (CAPS)
A MetalCluster is Sidero’s view of the cluster resource.
This resource allows users to define the control plane endpoint that corresponds to the Kubernetes API server.
This resource corresponds to the infrastructureRef section of Cluster API’s Cluster resource.
A MetalMachine is Sidero’s view of a machine.
Allows for reference of a single server or a server class from which a physical server will be picked to bootstrap.
MetalMachine provides a set of statuses describing the state (available with SideroLink, requires Talos >= 0.14):
status:
  addresses:
    - address: 172.25.0.5
        type: InternalIP
    - address: pxe-2
        type: Hostname
  conditions:
    - lastTransitionTime: "2022-02-11T14:20:42Z"
      message: 'Get ... connection refused'
      reason: ProviderUpdateFailed
      severity: Warning
      status: "False"
      type: ProviderSet
    - lastTransitionTime: "2022-02-11T12:48:35Z"
      status: "True"
      type: TalosConfigLoaded
    - lastTransitionTime: "2022-02-11T12:48:35Z"
      status: "True"
      type: TalosConfigValidated
    - lastTransitionTime: "2022-02-11T12:48:35Z"
      status: "True"
      type: TalosInstalled
Statuses:
addresses lists the current IP addresses and hostname of the node, addresses are updated when the node addresses are changedconditions:
ProviderSet: captures the moment infrastrucutre provider ID is set in the Node specification; depends on workload cluster control plane availabilityTalosConfigLoaded: Talos successfully loaded machine configuration from Sidero; if this condition indicates a failure, check sidero-controller-manager logsTalosConfigValidated: Talos successfully validated machine configuration; a failure in this condition indicates that the machine config is malformedTalosInstalled: Talos was successfully installed to disk
A MetalMachineTemplate is similar to a MetalMachine above, but serves as a template that is reused for resources like MachineDeployments or TalosControlPlanes that allocate multiple Machines at once.
ServerBindings
ServerBindings represent a one-to-one mapping between a Server resource and a MetalMachine resource.
A ServerBinding is used internally to keep track of servers that are allocated to a Kubernetes cluster and used to make decisions on cleaning and returning servers to a ServerClass upon deallocation.
Environments
These define a desired deployment environment for Talos, including things like which kernel to use, kernel args to pass, and the initrd to use.
Sidero allows you to define a default environment, as well as other environments that may be specific to a subset of nodes.
Users can override the environment at the ServerClass or Server level, if you have requirements for different kernels or kernel parameters.
See the Environments section of our Configuration docs for examples and more detail.
Servers
These represent physical machines as resources in the management plane.
These Servers are created when the physical machine PXE boots and completes a “discovery” process in which it registers with the management plane and provides SMBIOS information such as the CPU manufacturer and version, and memory information.
See the Servers section of our Configuration docs for examples and more detail.
ServerClasses
ServerClasses are a grouping of the Servers mentioned above, grouped to create classes of servers based on Memory, CPU or other attributes.
These can be used to compose a bank of Servers that are eligible for provisioning.
See the ServerClasses section of our Configuration docs for examples and more detail.
Sidero Controller Manager
While the controller does not present unique CRDs within Kubernetes, it’s important to understand the metadata resources that are returned to physical servers during the boot process.
The Sidero controller manager server may be familiar to you if you have used cloud environments previously.
Using Talos machine configurations created by the Talos Cluster API bootstrap provider, along with patches specified by editing Server/ServerClass resources or TalosConfig/TalosControlPlane resources, metadata is returned to servers who query the controller manager at boot time.
See the Metadata section of our Configuration docs for examples and more detail.
1.7 - System Requirements
System Requirements
Most of the time, Sidero does very little, so it needs very few resources.
However, since it is in charge of any number of workload clusters, it should
be built with redundancy.
It is also common, if the cluster is single-purpose,
to combine the controlplane and worker node roles.
Virtual machines are also
perfectly well-suited for this role.
Minimum suggested dimensions:
- Node count: 3
- Node RAM: 4GB
- Node CPU: ARM64 or x86-64 class
- Node storage: 32GB storage on system disk
2 - Getting Started
This tutorial will walk you through a complete Sidero setup and the formation,
scaling, and destruction of a workload cluster.
To complete this tutorial, you will need a few things:
- ISC DHCP server.
While any DHCP server will do, we will be presenting the
configuration syntax for ISC DHCP.
This is the standard DHCP server available on most Linux distributions (NOT
dnsmasq) as well as on the Ubiquiti EdgeRouter line of products.
- Machine or Virtual Machine on which to run Sidero itself.
The requirements for this machine are very low, it can be x86 or arm64
and it should have at least 4GB of RAM.
- Machines on which to run Kubernetes clusters.
These have the same minimum specifications as the Sidero machine.
- Workstation on which
talosctl, kubectl, and clusterctl can be run.
Useful Terms
ClusterAPI or CAPI is the common system for managing Kubernetes clusters
in a declarative fashion.
Management Cluster is the cluster on which Sidero itself runs.
It is generally a special-purpose Kubernetes cluster whose sole responsibility
is maintaining the CRD database of Sidero and providing the services necessary
to manage your workload Kubernetes clusters.
Sidero is the ClusterAPI-powered system which manages baremetal
infrastructure for Kubernetes.
Talos is the Kubernetes-focused Linux operating system built by the same
people who bring to you Sidero.
It is a very small, entirely API-driven OS which is meant to provide a reliable
and self-maintaining base on which Kubernetes clusters may run.
More information about Talos can be found at
https://talos.dev.
Workload Cluster is a cluster, managed by Sidero, on which your Kubernetes
workloads may be run.
The workload clusters are where you run your own applications and infrastructure.
Sidero creates them from your available resources, maintains them over time as
your needs and resources change, and removes them whenever it is told to do so.
2.1 - Prerequisite: CLI tools
Prerequisite: CLI tools
You will need three CLI tools installed on your workstation in order to interact
with Sidero:
kubectlclusterctltalosctl
Install kubectl
Since kubectl is the standard Kubernetes control tool, many distributions
already exist for it.
Feel free to check your own package manager to see if it is available natively.
Otherwise, you may install it directly from the main distribution point.
The main article for this can be found
here.
sudo curl -Lo /usr/local/bin/kubectl \
  "https://dl.k8s.io/release/$(\
  curl -L -s https://dl.k8s.io/release/stable.txt\
  )/bin/linux/amd64/kubectl"
sudo chmod +x /usr/local/bin/kubectl
Install clusterctl
The clusterctl tool is the standard control tool for ClusterAPI (CAPI).
It is less common, so it is also less likely to be in package managers.
The main article for installing clusterctl can be found
here.
sudo curl -Lo /usr/local/bin/clusterctl \
  "https://github.com/kubernetes-sigs/cluster-api/releases/download/v1.5.0/clusterctl-$(uname -s | tr '[:upper:]' '[:lower:]')-amd64"
sudo chmod +x /usr/local/bin/clusterctl
Note: This version of Sidero is only compatible with CAPI v1beta1,
so please install the latest version of clusterctl v1.x.
Install talosctl
The talosctl tool is used to interact with the Talos (our Kubernetes-focused
operating system) API.
The latest version can be found on our
Releases page.
sudo curl -Lo /usr/local/bin/talosctl \
 "https://github.com/talos-systems/talos/releases/latest/download/talosctl-$(uname -s | tr '[:upper:]' '[:lower:]')-amd64"
sudo chmod +x /usr/local/bin/talosctl
2.2 - Prerequisite: Kubernetes
Prerequisite: Kubernetes
In order to run Sidero, you first need a Kubernetes “cluster”.
There is nothing special about this cluster.
It can be, for example:
- a Kubernetes cluster you already have
- a single-node cluster running in Docker on your laptop
- a cluster running inside a virtual machine stack such as VMWare
- a Talos Kubernetes cluster running on a spare machine
Two important things are needed in this cluster:
- Kubernetes
v1.26 or later - Ability to expose TCP and UDP Services to the workload cluster machines
For the purposes of this tutorial, we will create this cluster in Docker on a
workstation, perhaps a laptop.
If you already have a suitable Kubernetes cluster, feel free to skip this step.
Create a Local Management Cluster
The talosctl CLI tool has built-in support for spinning up Talos in docker containers.
Let’s use this to our advantage as an easy Kubernetes cluster to start from.
Issue the following to create a single-node Docker-based Kubernetes cluster:
export HOST_IP="192.168.1.150"

talosctl cluster create \
  --name sidero-demo \
  -p 67:67/udp,69:69/udp,8081:8081/tcp,51821:51821/udp \
  --workers 0 \
  --config-patch '[{"op": "add", "path": "/cluster/allowSchedulingOnControlPlanes", "value": true}]' \
  --endpoint $HOST_IP
The 192.168.1.150 IP address should be changed to the IP address of your Docker
host.
This is not the Docker bridge IP but the standard IP address of the
workstation.
Note that there are four ports mentioned in the command above.
The first (67) is for DHCP proxy.
The second (69) is
for TFTP.
The third (8081) is for the web server (which serves netboot
artifacts and configuration).
The fourth (51821) is for the SideroLink Wireguard network.
Exposing them here allows us to access the services that will get deployed on this node.
In turn, we will be running our Sidero services with hostNetwork: true,
so the Docker host will forward these to the Docker container,
which will in turn be running in the same namespace as the Sidero Kubernetes components.
A full separate management cluster will likely approach this differently,
with a load balancer or a means of sharing an IP address across multiple nodes (such as with MetalLB).
Finally, the --config-patch is optional,
but since we are running a single-node cluster in this Tutorial,
adding this will allow Sidero to run on the controlplane.
Otherwise, you would need to add worker nodes to this management plane cluster to be
able to run the Sidero components on it.
Access the cluster
Once the cluster create command is complete, you can retrieve the kubeconfig for it using the Talos API:
Note: by default, Talos will merge the kubeconfig for this cluster into your
standard kubeconfig under the context name matching the cluster name your
created above.
If this name conflicts, it will be given a -1, a -2 or so
on, so it is generally safe to run.
However, if you would prefer to not modify your standard kubeconfig, you can
supply a directory name as the third parameter, which will cause a new
kubeconfig to be created there instead.
Remember that if you choose to not use the standard location, your should set
your KUBECONFIG environment variable or pass the --kubeconfig option to
tell the kubectl client the name of the kubeconfig file.
2.3 - Prerequisite: DHCP service
Prerequisite: DHCP Service
Automatic DHCP Proxy
Sidero v0.6 comes with DHCP proxy which augments the DHCP service provided by the network environment with
PXE boot instructions automatically.
There is no configuration required besides configuring the network environment DHCP server to assign IPs to the
machines.
If the Sidero Metal DHCP proxy server is not enabled, follow the next section to set up the DHCP server.
Manual DHCP Server Configuration
Note: This section is only required if you are not using the automatic DHCP proxy.
In order to network boot Talos, we need to set up our DHCP server to supply the
network boot parameters to our servers.
For maximum flexibility, Sidero makes use of iPXE to be able to reference
artifacts via HTTP.
Some modern servers support direct UEFI HTTP boot, but most servers
still rely on the old TFTP-based PXE boot first.
Therefore, we need to tell our DHCP server to find the iPXE binary on a TFTP
server.
Conveniently, Sidero comes with a TFTP server which will serve the appropriate
files.
We need only set up our DHCP server to point to it.
The tricky bit is that at different phases, we need to serve different assets,
but they all use the same DHCP metadata key.
In fact, we have as many as six different client types:
- Legacy BIOS-based PXE boot (undionly.kpxe via TFTP)
- UEFI-based PXE boot (snp.efi/ipxe.efi via TFTP)
- UEFI HTTP boot (snp.efi/ipxe.efi via HTTP URL)
- iPXE (boot.ipxe via HTTP URL)
- UEFI-based PXE arm64 boot (ipxe-arm64.efi via TFTP)
- UEFI HTTP boot on arm64 (ipxe-arm64.efi via HTTP URL)
UEFI iPXE modules
There are two iPXE modules available with Sidero Metal:
snp.efi uses iPXE network drivers to configure networking.ipxe.efi uses the UEFI network drivers to configure networking.
It is recommended to use snp.efi for UEFI-based PXE boot, since it is more reliable.
However, some UEFI implementations do not support snp.efi and require ipxe.efi instead.
Common client types
If you are lucky and all of the machines in a given DHCP zone can use the same
network boot client mechanism, your DHCP server only needs to provide two
options:
Server-Name (option 66) with the IP of the Sidero TFTP serviceBootfile-Name (option 67) with the appropriate value for the boot client type:
- Legacy BIOS PXE boot:
undionly.kpxe - UEFI-based PXE boot:
snp.efi (fallback to ipxe.efi if snp.efi doesn’t work) - UEFI HTTP boot:
http://sidero-server-url/tftp/ipxe.efi (fallback to ipxe.efi if snp.efi doesn’t work) - iPXE boot:
http://sidero-server-url/boot.ipxe - arm64 UEFI PXE boot:
snp-arm64.efi (fallback to ipxe-arm64.efi if snp-arm64.efi doesn’t work) - arm64 UEFI HTTP boot:
http://sidero-server-url/tftp/ipxe-arm64.efi (fallback to ipxe-arm64.efi if snp-arm64.efi doesn’t work)
In the ISC DHCP server, these options look like:
next-server 172.16.199.50;
filename "snp.efi";
Multiple client types
If you have a mix of machines, you may need a way to provide different images for different machine types.
Most DHCP servers provide ways to supply such conditional responses: the examples below are for ISC DHCP.
In our example below, 172.16.199.50 is the IP address of our Sidero service.
ipxe-metal.conf:
allow bootp;
allow booting;

# IP address for PXE-based TFTP methods
next-server 172.16.199.50;

# Configuration for iPXE clients
class "ipxeclient" {
  match if exists user-class and (option user-class = "iPXE");
  filename "http://172.16.199.50/boot.ipxe";
}

# Configuration for legacy BIOS-based PXE boot
class "biosclients" {
  match if not exists user-class and substring (option vendor-class-identifier, 15, 5) = "00000";
  filename "undionly.kpxe";
}

# Configuration for UEFI-based PXE boot
class "pxeclients" {
  match if not exists user-class and substring (option vendor-class-identifier, 0, 9) = "PXEClient";
  filename "snp.efi";
}

# Configuration for UEFI-based HTTP boot
class "httpclients" {
  match if not exists user-class and substring (option vendor-class-identifier, 0, 10) = "HTTPClient";
  option vendor-class-identifier "HTTPClient";
  filename "http://172.16.199.50/tftp/snp.efi";
}
Once this file is created, we can include it from our main dhcpd.conf inside a
subnet section.
shared-network sidero {
  subnet 172.16.199.0 netmask 255.255.255.0 {
    option domain-name-servers 8.8.8.8, 1.1.1.1;
    option routers 172.16.199.1;
    include "/config/ipxe-metal.conf";
  }
}
Since we use a number of Ubiquiti EdgeRouter devices in our home test
networks, it is worth mentioning the syntax gymnastics we must go
through there.
Essentially, the quotes around the path need to be entered as HTML entities:
".
Ubiquiti EdgeRouter configuration statement:
set service dhcp-server shared-network-name sidero \
  subnet 172.16.199.1 \
  subnet-parameters "include "/config/ipxe-metal.conf";"
Also note the fact that there are two semicolons at the end of the line.
The first is part of the HTML-encoded " (") and the second is the actual terminating semicolon.
Troubleshooting
Getting the netboot environment correct is tricky and debugging it is difficult:
the problem is nearly always one of a missing or incorrect configuration, since
the process involves several different components.
See the Sidero Troubleshooting guide for more assistance.
2.4 - Install Sidero
Install Sidero
Sidero is included as a default infrastructure provider in clusterctl, so the
installation of both Sidero and the Cluster API (CAPI) components is as simple
as using the clusterctl tool.
Note: Because Cluster API upgrades are stateless, it is important to keep all Sidero
configuration for reuse during upgrades.
Sidero has a number of configuration options which should be supplied at install
time, kept, and reused for upgrades.
These can also be specified in the clusterctl configuration file
($HOME/.cluster-api/clusterctl.yaml).
You can reference the clusterctl
docs
for more information on this.
For our purposes, we will use environment variables for our configuration
options.
export SIDERO_CONTROLLER_MANAGER_HOST_NETWORK=true
export SIDERO_CONTROLLER_MANAGER_DEPLOYMENT_STRATEGY=Recreate
export SIDERO_CONTROLLER_MANAGER_API_ENDPOINT=192.168.1.150
export SIDERO_CONTROLLER_MANAGER_SIDEROLINK_ENDPOINT=192.168.1.150

clusterctl init -b talos -c talos -i sidero
First, we are telling Sidero to use hostNetwork: true so that it binds its
ports directly to the host, rather than being available only from inside the
cluster.
There are many ways of exposing the services, but this is the simplest
path for the single-node management cluster.
When you scale the management cluster, you will need to use an alternative
method, such as an external load balancer or something like
MetalLB.
The 192.168.1.150 IP address is the IP address or DNS hostname as seen from the workload
clusters.
In our case, this should be the main IP address of your Docker
workstation.
Note: If you encounter the following error, this is caused by a rename of our GitHub org from talos-systems to siderolabs.
$ clusterctl init -b talos -c talos -i sidero
Fetching providers
Error: failed to get provider components for the "talos" provider: target namespace can't be defaulted. Please specify a target namespace
This can be worked around by adding the following to ~/.cluster-api/clusterctl.yaml and rerunning the init command:
providers:
  - name: "talos"
    url: "https://github.com/siderolabs/cluster-api-bootstrap-provider-talos/releases/latest/bootstrap-components.yaml"
    type: "BootstrapProvider"
  - name: "talos"
    url: "https://github.com/siderolabs/cluster-api-control-plane-provider-talos/releases/latest/control-plane-components.yaml"
    type: "ControlPlaneProvider"
  - name: "sidero"
    url: "https://github.com/siderolabs/sidero/releases/latest/infrastructure-components.yaml"
    type: "InfrastructureProvider"
2.5 - Expose Sidero Services
A guide for bootstrapping Sidero management plane
If you built your cluster as specified in the [Prerequisite: Kubernetes] section in this tutorial, your services are already exposed and you can skip this section.
There are four external Services which Sidero serves and which must be made
reachable by the servers which it will be driving.
DHCP Proxy (port 67/udp) is needed for all servers to provide PXE boot instructions.
Most probably it can be only exposed via host network mode, as it requires receiving and sending packets
targeted to the broadcast address.
If DHCP Proxy is not exposed, follow Prerequisite: DHCP service section to set up the DHCP server in your environment.
For most servers, TFTP (port 69/udp) will be needed.
This is used for PXE booting, both BIOS and UEFI.
Being a primitive UDP protocol, many load balancers do not support TFTP.
Instead, solutions such as MetalLB may be used to expose TFTP over a known IP address.
For servers which support UEFI HTTP Network Boot, TFTP need not be used.
The kernel, initrd, and all configuration assets are served from the HTTP service
(port 8081/tcp).
It is needed for all servers, but since it is HTTP-based, it
can be easily proxied, load balanced, or run through an ingress controller.
Overlay Wireguard SideroLink network requires UDP port 51821 to be open.
Same as TFTP, many load balancers do not support Wireguard UDP protocol.
Instead, use MetalLB.
The main thing to keep in mind is that the services MUST match the IP or
hostname specified by the SIDERO_CONTROLLER_MANAGER_API_ENDPOINT and
SIDERO_CONTROLLER_MANAGER_SIDEROLINK_ENDPOINT environment
variables (or configuration parameters) when you installed Sidero.
It is a good idea to verify that the services are exposed as you think they
should be.
$ curl -I http://192.168.1.150:8081/tftp/snp.efi
HTTP/1.1 200 OK
Accept-Ranges: bytes
Content-Length: 1020416
Content-Type: application/octet-stream
2.6 - Import Workload Machines
A guide for bootstrapping Sidero management plane
At this point, any servers on the same network as Sidero should network boot from Sidero.
To register a server with Sidero, simply turn it on and Sidero will do the rest.
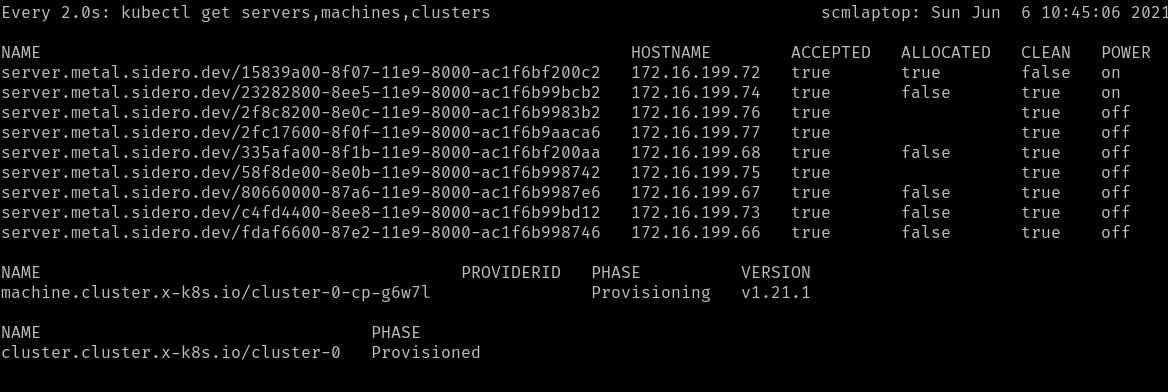
Once the registration is complete, you should see the servers registered with kubectl get servers:
$ kubectl get servers -o wide
NAME                                   HOSTNAME        ACCEPTED   ALLOCATED   CLEAN
00000000-0000-0000-0000-d05099d33360   192.168.1.201   false      false       false
Accept the Servers
Note in the output above that the newly registered servers are not accepted.
In order for a server to be eligible for consideration, it must be marked as accepted.
Before a Server is accepted, no write action will be performed against it.
This default is for safety (don’t accidentally delete something just because it
was plugged in) and security (make sure you know the machine before it is given
credentials to communicate).
Note: if you are running in a safe environment, you can configure Sidero to
automatically accept new machines.
For more information on server acceptance, see the server docs.
Create ServerClasses
By default, Sidero comes with a single ServerClass any which matches any
(accepted) server.
This is sufficient for this demo, but you may wish to have
more flexibility by defining your own ServerClasses.
ServerClasses allow you to group machines which are sufficiently similar to
allow for unnamed allocation.
This is analogous to cloud providers using such classes as m3.large or
c2.small, but the names are free-form and only need to make sense to you.
For more information on ServerClasses, see the ServerClass
docs.
Hardware differences
In baremetal systems, there are commonly certain small features and
configurations which are unique to the hardware.
In many cases, such small variations may not require special configurations, but
others do.
If hardware-specific differences do mandate configuration changes, we need a way
to keep those changes local to the hardware specification so that at the higher
level, a Server is just a Server (or a server in a ServerClass is just a Server
like all the others in that Class).
The most common variations seem to be the installation disk and the console
serial port.
Some machines have NVMe drives, which show up as something like /dev/nvme0n1.
Others may be SATA or SCSI, which show up as something like /dev/sda.
Some machines use /dev/ttyS0 for the serial console; others /dev/ttyS1.
Configuration patches can be applied to either Servers or ServerClasses, and
those patches will be applied to the final machine configuration for those
nodes without having to know anything about those nodes at the allocation level.
For examples of install disk patching, see the Installation Disk
doc.
For more information about patching in general, see the Patching
Guide.
2.7 - Create a Workload Cluster
Create a Workload Cluster
Once created and accepted, you should see the servers that make up your ServerClasses appear as “available”:
$ kubectl get serverclass
NAME      AVAILABLE                                  IN USE
any       ["00000000-0000-0000-0000-d05099d33360"]   []
Generate Cluster Manifests
We are now ready to generate the configuration manifest templates for our first workload
cluster.
There are several configuration parameters that should be set in order for the templating to work properly:
CONTROL_PLANE_ENDPOINT: The endpoint used for the Kubernetes API server (e.g. https://1.2.3.4:6443).
This is the equivalent of the endpoint you would specify in talosctl gen config.
There are a variety of ways to configure a control plane endpoint.
Some common ways for an HA setup are to use DNS, a load balancer, or BGP.
A simpler method is to use the IP of a single node.
This has the disadvantage of being a single point of failure, but it can be a simple way to get running.CONTROL_PLANE_SERVERCLASS: The server class to use for control plane nodes.WORKER_SERVERCLASS: The server class to use for worker nodes.KUBERNETES_VERSION: The version of Kubernetes to deploy (e.g. v1.21.1).CONTROL_PLANE_PORT: The port used for the Kubernetes API server (port 6443)
For instance:
export CONTROL_PLANE_SERVERCLASS=any
export WORKER_SERVERCLASS=any
export TALOS_VERSION=v1.5.1
export KUBERNETES_VERSION=v1.28.1
export CONTROL_PLANE_PORT=6443
export CONTROL_PLANE_ENDPOINT=1.2.3.4

clusterctl generate cluster cluster-0 -i sidero > cluster-0.yaml
Take a look at this new cluster-0.yaml manifest and make any changes as you
see fit.
Feel free to adjust the replicas field of the TalosControlPlane and MachineDeployment objects to match the number of machines you want in your controlplane and worker sets, respectively.
MachineDeployment (worker) count is allowed to be 0.
Of course, these may also be scaled up or down after they have been created,
as well.
Create the Cluster
When you are satisfied with your configuration, go ahead and apply it to Sidero:
kubectl apply -f cluster-0.yaml
At this point, Sidero will allocate Servers according to the requests in the
cluster manifest.
Once allocated, each of those machines will be installed with Talos, given their
configuration, and form a cluster.
You can watch the progress of the Servers being selected:
watch kubectl --context=sidero-demo \
  get servers,machines,clusters
First, you should see the Cluster created in the Provisioning phase.
Once the Cluster is Provisioned, a Machine will be created in the
Provisioning phase.
During the Provisioning phase, a Server will become allocated, the hardware
will be powered up, Talos will be installed onto it, and it will be rebooted
into Talos.
Depending on the hardware involved, this may take several minutes.
Eventually, the Machine should reach the Running phase.
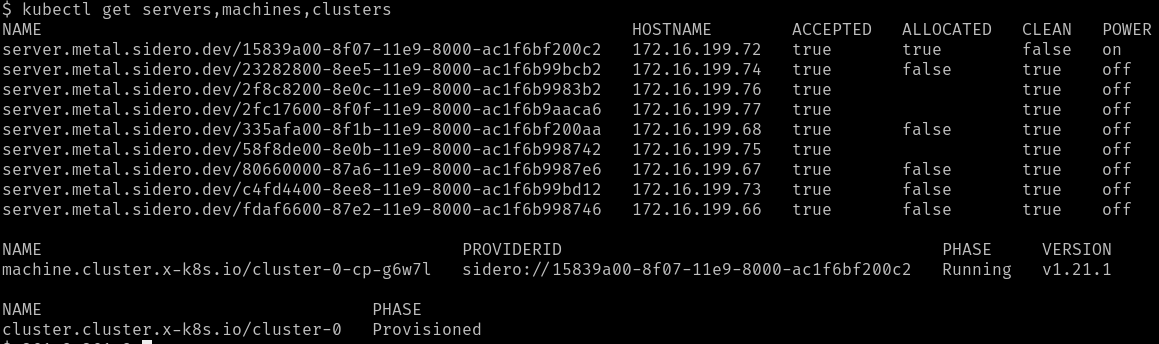
The initial controlplane Machine will always be started first.
Any additional nodes will be started after that and will join the cluster when
they are ready.
Retrieve the Talosconfig
In order to interact with the new machines (outside of Kubernetes), you will
need to obtain the talosctl client configuration, or talosconfig.
You can do this by retrieving the secret from the Sidero
management cluster:
kubectl --context=sidero-demo \
    get secret \
    cluster-0-talosconfig \
    -o jsonpath='{.data.talosconfig}' \
  | base64 -d \
   > cluster-0-talosconfig
Retrieve the Kubeconfig
With the talosconfig obtained, the workload cluster’s kubeconfig can be retrieved in the normal Talos way:
talosctl --talosconfig cluster-0-talosconfig --nodes <CONTROL_PLANE_IP> kubeconfig
Check access
Now, you should have two cluster available: you management cluster
(sidero-demo) and your workload cluster (cluster-0).
kubectl --context=sidero-demo get nodes
kubectl --context=cluster-0 get nodes
2.8 - Scale the Workload Cluster
A guide for bootstrapping Sidero management plane
If you have more machines available, you can scale both the controlplane
(TalosControlPlane) and the workers (MachineDeployment) for any cluster
after it has been deployed.
This is done just like normal Kubernetes Deployments.
kubectl scale taloscontrolplane cluster-0-cp --replicas=3
2.9 - Optional: Management cluster
A guide for bootstrapping Sidero management plane
Having the Sidero cluster running inside a Docker container is not the most
robust place for it, but it did make for an expedient start.
It might be a good idea to move it to a more robust setup, such as a dedicated bare-metal server,
or a virtual machine.
It also makes sense to establish regular backups of etcd in the management cluster to make sure the state of the cluster can be restored in case of a disaster.
2.10 - Troubleshooting
Troubleshooting
The first thing to do in troubleshooting problems with the Sidero installation
and operation is to figure out where in the process that failure is occurring.
Keep in mind the general flow of the pieces.
For instance:
- A server is configured by its BIOS/CMOS to attempt a network boot using the PXE firmware on
its network card(s).
- That firmware requests network and PXE boot configuration via DHCP.
- DHCP points the firmware to the Sidero TFTP or HTTP server (depending on the firmware type).
- The second stage boot, iPXE, is loaded and makes an HTTP request to the
Sidero metadata server for its configuration, which contains the URLs for
the kernel and initrd images.
- The kernel and initrd images are downloaded by iPXE and boot into the Sidero
agent software (if the machine is not yet known and assigned by Sidero).
- The agent software reports to the Sidero metadata server via HTTP the hardware information of the machine.
- A (usually human or external API) operator verifies and accepts the new
machine into Sidero.
- The agent software reboots and wipes the newly-accepted machine, then powers
off the machine to wait for allocation into a cluster.
- The machine is allocated by Sidero into a Kubernetes Cluster.
- Sidero tells the machine, via IPMI, to boot into the OS installer
(following all the same network boot steps above).
- The machine downloads its configuration from the Sidero metadata server via
HTTP.
- The machine applies its configuration, installs a bootloader, and reboots.
- The machine, upon reboot from its local disk, joins the Kubernetes cluster
and continues until Sidero tells it to leave the cluster.
- Sidero tells the machine to leave the cluster and reboots it into network
boot mode, via IPMI.
- The machine netboots into wipe mode, wherein its disks are again wiped to
come back to the “clean” state.
- The machine again shuts down and waits to be needed.
Device firmware (PXE boot)
The worst place to fail is also, unfortunately, the most common.
This is the firmware phase, where the network card’s built-in firmware attempts
to initiate the PXE boot process.
This is the worst place because the firmware is completely opaque, with very
little logging, and what logging does appear frequently is wiped from the
console faster than you can read it.
If you fail here, the problem will most likely be with your DHCP configuration,
though it could also be in the Sidero TFTP service configuration.
Validate Sidero TFTP service
The easiest to validate is to use a tftp client to validate that the Sidero
TFTP service is available at the IP you are advertising via DHCP.
  $ atftp 172.16.199.50
  tftp> get snp.efi
TFTP is an old, slow protocol with very little feedback or checking.
Your only real way of telling if this fails is by timeout.
Over a local network, this get command should take a few seconds.
If it takes longer than 30 seconds, it is probably not working.
Success is also not usually indicated:
you just get a prompt returned, and the file should show up in your current
directory.
If you are failing to connect to TFTP, the problem is most likely with your
Sidero Service exposure:
how are you exposing the TFTP service in your management cluster to the outside
world?
This normally involves either setting host networking on the Deployment or
installing and using something like MetalLB.
3 - Resource Configuration
3.1 - Environments
Environments are a custom resource provided by the Metal Controller Manager.
An environment is a codified description of what should be returned by the PXE server when a physical server attempts to PXE boot.
Especially important in the environment types are the kernel args.
From here, one can tweak the IP to the metadata server as well as various other kernel options that Talos and/or the Linux kernel supports.
Environments can be supplied to a given server either at the Server or the ServerClass level.
The hierarchy from most to least respected is:
.spec.environmentRef provided at Server level.spec.environmentRef provided at ServerClass level"default" Environment created automatically and modified by an administrator
A sample environment definition looks like this:
apiVersion: metal.sidero.dev/v1alpha2
kind: Environment
metadata:
  name: default
spec:
  kernel:
    url: "https://github.com/talos-systems/talos/releases/download/v0.14.0/vmlinuz-amd64"
    sha512: ""
    args:
      - console=tty0
      - console=ttyS1,115200n8
      - consoleblank=0
      - earlyprintk=ttyS1,115200n8
      - ima_appraise=fix
      - ima_hash=sha512
      - ima_template=ima-ng
      - init_on_alloc=1
      - initrd=initramfs.xz
      - nvme_core.io_timeout=4294967295
      - printk.devkmsg=on
      - pti=on
      - random.trust_cpu=on
      - slab_nomerge=
      - talos.platform=metal
  initrd:
    url: "https://github.com/talos-systems/talos/releases/download/v0.14.0/initramfs-amd64.xz"
    sha512: ""
Example of overriding "default" Environment at the Server level:
apiVersion: metal.sidero.dev/v1alpha2
kind: Server
...
spec:
  environmentRef:
    namespace: default
    name: boot
  ...
Example of overriding "default" Environment at the ServerClass level:
apiVersion: metal.sidero.dev/v1alpha2
kind: ServerClass
...
spec:
  environmentRef:
    namespace: default
    name: boot
  ...
3.2 - Servers
Servers are the basic resource of bare metal in the Metal Controller Manager.
These are created by PXE booting the servers and allowing them to send a registration request to the management plane.
An example server may look like the following:
apiVersion: metal.sidero.dev/v1alpha2
kind: Server
metadata:
  name: 00000000-0000-0000-0000-d05099d333e0
  labels:
    common-label: "true"
    zone: east
    environment: test
spec:
  accepted: false
  configPatches:
    - op: replace
      path: /cluster/network/cni
      value:
        name: custom
        urls:
          - http://192.168.1.199/assets/cilium.yaml
  hardware:
    system:
      manufacturer: Dell Inc.
      productName: PowerEdge R630
      serialNumber: 790H8D2
    compute:
      totalCoreCount: 8
      totalThreadCount: 16
      processorCount: 1
      processors:
        - manufacturer: Intel
          productName: Intel(R) Xeon(R) CPU E5-2630 v3 @ 2.40GHz
          speed: 2400
          coreCount: 8
          threadCount: 16
    memory:
      totalSize: 32 GB
      moduleCount: 2
      modules:
        - manufacturer: 002C00B3002C
          productName: 18ASF2G72PDZ-2G3B1
          serialNumber: 12BDC045
          type: LPDDR3
          size: 16384
          speed: 2400
        - manufacturer: 002C00B3002C
          productName: 18ASF2G72PDZ-2G3B1
          serialNumber: 12BDBF5D
          type: LPDDR3
          size: 16384
          speed: 2400
    storage:
      totalSize: 1116 GB
      deviceCount: 1
      devices:
        - productName: PERC H730 Mini
          type: HDD
          name: sda
          deviceName: /dev/sda
          size: 1199101181952
          wwid: naa.61866da055de070028d8e83307cc6df2
    network:
      interfaceCount: 2
      interfaces:
        - index: 1
          name: lo
          flags: up|loopback
          mtu: 65536
          mac: ""
          addresses:
            - 127.0.0.1/8
            - ::1/128
        - index: 2
          name: enp3s0
          flags: up|broadcast|multicast
          mtu: 1500
          mac: "40:8d:5c:86:5a:14"
          addresses:
            - 192.168.2.8/24
            - fe80::dcb3:295c:755b:91bb/64
Installation Disk
An installation disk is required by Talos on bare metal.
This can be specified in a configPatch:
apiVersion: metal.sidero.dev/v1alpha2
kind: Server
...
spec:
  accepted: false
  configPatches:
    - op: replace
      path: /machine/install/disk
      value: /dev/sda
The install disk patch can also be set on the ServerClass:
apiVersion: metal.sidero.dev/v1alpha2
kind: ServerClass
...
spec:
  configPatches:
    - op: replace
      path: /machine/install/disk
      value: /dev/sda
Server Acceptance
In order for a server to be eligible for consideration, it must be accepted.
This is an important separation point which all Servers must pass.
Before a Server is accepted, no write action will be performed against it.
Thus, it is safe for a computer to be added to a network on which Sidero is operating.
Sidero will never write to or wipe any disk on a computer which is not marked as accepted.
This can be tedious for systems in which all attached computers should be considered to be under the control of Sidero.
Thus, you may also choose to automatically accept any machine into Sidero on its discovery.
Please keep in mind that this means that any newly-connected computer WILL BE WIPED automatically.
You can enable auto-acceptance by passing the --auto-accept-servers=true flag to sidero-controller-manager.
Once accepted, a server will be reset (all disks wiped) and then made available to Sidero.
You should never change an accepted Server to be not accepted while it is in use.
Because servers which are not accepted will not be modified, if a server which
was accepted is changed to not accepted, the disk will not be wiped upon
its exit.
IPMI
Sidero can use IPMI information to control Server power state, reboot servers and set boot order.
IPMI information will be, by default, setup automatically if possible as part of the acceptance process.
In this design, a “sidero” user will be added to the IPMI user list and a randomly generated password will be issued.
This information is then squirreled away in a Kubernetes secret in the sidero-system namespace, with a name format of <server-uuid>-bmc.
Users wishing to turn off this feature can pass the --auto-bmc-setup=false flag to sidero-controller-manager,
e.g. using export SIDERO_CONTROLLER_MANAGER_AUTO_BMC_SETUP=false during installation.
IPMI connection information can also be set manually in the Server spec after initial registration:
apiVersion: metal.sidero.dev/v1alpha2
kind: Server
...
spec:
  bmc:
    endpoint: 10.0.0.25
    user: admin
    pass: password
If IPMI information is set, server boot order might be set to boot from disk, then network, Sidero will switch servers
to PXE boot once that is required.
Without IPMI info, Sidero can still register servers, wipe them and provision clusters, but Sidero won’t be able to reboot servers once they are removed from the cluster.
If IPMI info is not set, servers should be configured to boot first from network, then from disk.
Sidero can also fetch IPMI credentials via the Secret reference:
apiVersion: metal.sidero.dev/v1alpha2
kind: Server
...
spec:
  bmc:
    endpoint: 10.0.0.25
    userFrom:
      secretKeyRef:
        name: ipmi-credentials
        key: username
    passFrom:
      secretKeyRef:
        name: ipmi-credentials
        key: password
As the Server resource is not namespaced, Secret should be created in the default namespace.
Other Settings
cordoned
If cordoned is set to true, Server gets excluded from any ServerClass it might match based on qualifiers.
This means that the Server will not be allocated automatically.
Server might be cordoned to temporarily take it out of the ServerClass to perform for example hardware maintenance.
apiVersion: metal.sidero.dev/v1alpha1
kind: Server
...
spec:
  cordoned: true
pxeBootAlways
Server might be forced to boot from the network even if the OS is already installed with pxeBootAlways: true:
apiVersion: metal.sidero.dev/v1alpha1
kind: Server
...
spec:
  pxeBootAlways: true
bootFromDiskMethod
The method to exit iPXE network boot to force boot from disk can be configured for the Server:
apiVersion: metal.sidero.dev/v1alpha1
kind: Server
...
spec:
  bootFromDiskMethod: ipxe-sanboot
Valid values are:
ipxe-exithttp-404ipxe-sanboot
If not set, the ServerClass.spec.bootFromDiskMethod value is used with the fallback to the default boot from disk method (SIDERO_CONTROLLER_MANAGER_BOOT_FROM_DISK_METHOD).
3.3 - Server Classes
Server classes are a way to group distinct server resources.
The qualifiers and selector keys allow the administrator to specify criteria upon which to group these servers.
If both of these keys are missing, the server class matches all servers that it is watching.
If both of these keys define requirements, these requirements are combined (logical AND).
selector
selector groups server resources by their labels.
The Kubernetes documentation has more information on how to use this field.
qualifiers
A list of hardware criteria, where each entry in the list is interpreted as a logical OR.
All criteria inside each entry is interpreted as a logical AND.
Qualifiers that are not specified are not evaluated.
An example:
apiVersion: metal.sidero.dev/v1alpha2
kind: ServerClass
metadata:
  name: serverclass-sample
spec:
  selector:
    matchLabels:
      common-label: "true"
    matchExpressions:
      - key: zone
        operator: In
        values:
          - central
          - east
      - key: environment
        operator: NotIn
        values:
          - prod
  qualifiers:
    hardware:
      - system:
          manufacturer: Dell Inc.
        compute:
          processors:
            - manufacturer: Advanced Micro Devices, Inc.
              productName: AMD Ryzen 7 2700X Eight-Core Processor
      - compute:
          processors:
            - manufacturer: "Intel(R) Corporation"
              productName: "Intel(R) Atom(TM) CPU C3558 @ 2.20GHz"
        memory:
          totalSize: "8 GB"
Servers would only be added to the above class if they:
- have the label
common-label with value true - AND match the
matchExpressions - AND match either 1 of the following criteria:
- has a system manufactured by
Dell Inc. AND has at least 1 processor that is an AMD Ryzen 7 2700X Eight-Core Processor - has at least 1 processor that is an
Intel(R) Atom(TM) CPU C3558 @ 2.20GHz AND has exactly 8 GB of total memory
Additionally, Sidero automatically creates and maintains a server class called "any" that includes all (accepted) servers.
Attempts to add qualifiers to it will be reverted.
configPatches
Server configs of servers matching a server class can be updated by using the configPatches section of the custom resource.
See patching for more information on how this works.
An example of settings the default install disk for all servers matching a server class:
apiVersion: metal.sidero.dev/v1alpha2
kind: ServerClass
...
spec:
  configPatches:
    - op: replace
      path: /machine/install/disk
      value: /dev/sda
Other Settings
environmentRef
Servers from a ServerClass can be set to use the specific Environment by linking the Environment from the ServerClass:
apiVersion: metal.sidero.dev/v1alpha1
kind: ServerClass
...
spec:
  environmentRef:
    name: production-env
bootFromDiskMethod
The method to exit iPXE network boot to force boot from disk can be configured for all Server resources belonging to the ServerClass:
apiVersion: metal.sidero.dev/v1alpha1
kind: ServerClass
...
spec:
  bootFromDiskMethod: ipxe-sanboot
Valid values are:
ipxe-exithttp-404ipxe-sanboot
If not set, the default boot from disk method is used (SIDERO_CONTROLLER_MANAGER_BOOT_FROM_DISK_METHOD).
3.4 - Metadata
The Sidero controller manager manages the Machine metadata.
In terms of Talos (the OS on which the Kubernetes cluster is formed), this is the
“machine config”,
which is used during the automated installation.
Talos Machine Configuration
The configuration of each machine is constructed from a number of sources:
- The
TalosControlPlane custom resource for control plane nodes. - The
TalosConfigTemplate custom resource. - The
ServerClass which was used to select the Server into the Cluster. - Any
Server-specific patches.
An example usage of setting a virtual IP for the control plane nodes and adding extra node-labels to nodes is shown below:
Note: because of the way JSON patches work the interface setting also needs to be set in TalosControlPlane when defining a Virtual IP.
This experience is not ideal, but will be addressed in a future release.
TalosControlPlane custom resource:
apiVersion: controlplane.cluster.x-k8s.io/v1alpha3
kind: TalosControlPlane
metadata:
  name: workload-cluster
  namespace: default
spec:
  controlPlaneConfig:
    controlplane:
      configPatches:
      - op: add
        path: /machine/network
        value:
          interfaces:
          - interface: eth0
            dhcp: true
            vip:
              ip: 172.16.200.52
      generateType: controlplane
      talosVersion: v0.13
    init:
      configPatches:
      - op: add
        path: /machine/network
        value:
          interfaces:
          - interface: eth0
            dhcp: true
            vip:
              ip: 172.16.200.52
      generateType: init
      talosVersion: v0.13
  infrastructureTemplate:
    apiVersion: infrastructure.cluster.x-k8s.io/v1alpha3
    kind: MetalMachineTemplate
    name: workload-cluster
  replicas: 3
  version: v1.23.0
TalosConfigTemplate custom resource:
---
apiVersion: bootstrap.cluster.x-k8s.io/v1alpha3
kind: TalosConfigTemplate
metadata:
  name: workload-cluster
  namespace: default
spec:
  template:
    spec:
      generateType: join
      talosVersion: v0.13
      configPatches:
      - op: add
        path: /machine/kubelet
        value:
          extraArgs:
            node-labels:
              talos.dev/part-of: cluster/workload-cluster
and finally in the control plane ServerClass custom resource we augment the network information for other interfaces:
---
apiVersion: metal.sidero.dev/v1alpha2
kind: ServerClass
metadata:
  name: cp.small.x86
spec:
  configPatches:
  - op: replace
    path: /machine/install/disk
    value: /dev/nvme0n1
  - op: add
    path: /machine/install/extraKernelArgs
    value:
    - console=tty0
    - console=ttyS1,115200n8
  - op: add
    path: /machine/network/interfaces/-
    value:
      interface: eth1
      dhcp: true
  qualifiers:
    - system:
        manufacturer: Supermicro
      compute:
        processors:
          - productName: Intel(R) Xeon(R) E-2124G CPU @ 3.40GHz
      memory:
        totalSize: 8 GB
  selector:
    matchLabels:
      metal.sidero.dev/serverclass: cp.small.x86
the workload ServerClass defines the complete networking config
---
apiVersion: metal.sidero.dev/v1alpha2
kind: ServerClass
metadata:
  name: general.medium.x86
spec:
  configPatches:
  - op: replace
    path: /machine/install/disk
    value: /dev/nvme1n1
  - op: add
    path: /machine/install/extraKernelArgs
    value:
    - console=tty0
    - console=ttyS1,115200n8
  - op: add
    path: /machine/network
    value:
      interfaces:
      - interface: eth0
        dhcp: true
      - interface: eth1
        dhcp: true
  qualifiers:
    - system:
        manufacturer: Supermicro
      compute:
        processors:
          - productName: Intel(R) Xeon(R) E-2136 CPU @ 3.30GHz
      memory:
        totalSize: 16 GB
  selector:
    matchLabels:
      metal.sidero.dev/serverclass: general.medium.x86
The base template is constructed from the Talos bootstrap provider, using data from the associated TalosControlPlane and TalosConfigTemplate manifest.
Then, any configuration patches are applied from the ServerClass and Server.
These patches take the form of an RFC 6902 JSON (or YAML) patch.
An example of the use of this patch method can be found in Patching Guide.
Also note that while a Server can be a member of any number of ServerClasses, only the ServerClass which is used to select the Server into the Cluster will be used for the generation of the configuration of the Machine.
In this way, Servers may have a number of different configuration patch sets based on which Cluster they are in at any given time.
4 - Guides
4.1 - Bootstrapping
A guide for bootstrapping Sidero management plane
Introduction
Imagine a scenario in which you have shown up to a datacenter with only a laptop and your task is to transition a rack of bare metal machines into an HA management plane and multiple Kubernetes clusters created by that management plane.
In this guide, we will go through how to create a bootstrap cluster using a Docker-based Talos cluster, provision the management plane, and pivot over to it.
Guides around post-pivoting setup and subsequent cluster creation should also be found in the “Guides” section of the sidebar.
Because of the design of Cluster API, there is inherently a “chicken and egg” problem with needing a Kubernetes cluster in order to provision the management plane.
Talos Systems and the Cluster API community have created tools to help make this transition easier.
Prerequisites
First, you need to install the latest talosctl by running the following script:
curl -Lo /usr/local/bin/talosctl https://github.com/talos-systems/talos/releases/latest/download/talosctl-$(uname -s | tr "[:upper:]" "[:lower:]")-amd64
chmod +x /usr/local/bin/talosctl
You can read more about Talos and talosctl at talos.dev.
Next, there are two big prerequisites involved with bootstrapping Sidero: routing and DHCP setup.
From the routing side, the laptop from which you are bootstrapping must be accessible by the bare metal machines that we will be booting.
In the datacenter scenario described above, the easiest way to achieve this is probably to hook the laptop onto the server rack’s subnet by plugging it into the top-of-rack switch.
This is needed for TFTP, PXE booting, and for the ability to register machines with the bootstrap plane.
DHCP configuration is needed to tell the metal servers what their “next server” is when PXE booting.
The configuration of this is different for each environment and each DHCP server, thus it’s impossible to give an easy guide.
However, here is an example of the configuration for an Ubiquti EdgeRouter that uses vyatta-dhcpd as the DHCP service:
This block shows the subnet setup, as well as the extra “subnet-parameters” that tell the DHCP server to include the ipxe-metal.conf file.
These commands are run under the configure option in EdgeRouter
$ show service dhcp-server shared-network-name MetalDHCP

 authoritative enable
 subnet 192.168.254.0/24 {
     default-router 192.168.254.1
     dns-server 192.168.1.200
     lease 86400
     start 192.168.254.2 {
         stop 192.168.254.252
     }
     subnet-parameters "include "/config/ipxe-metal.conf";"
 }
Here is the ipxe-metal.conf file.
$ cat /config/ipxe-metal.conf

allow bootp;
allow booting;

next-server 192.168.1.150;
filename "snp.efi"; # use "undionly.kpxe" for BIOS netboot or "snp.efi" for UEFI netboot

host talos-mgmt-0 {
    fixed-address 192.168.254.2;
    hardware ethernet d0:50:99:d3:33:60;
}
If you want to boot multiple architectures, you can use the DHCP Option 93 to specify the architecture.
First we need to define option 93 in the DHCP server configuration.
set service dhcp-server global-parameters "option system-arch code 93 = unsigned integer 16;"
Now we can specify condition based on option 93 in ipxe-metal.conf file
$ cat /config/ipxe-metal.conf

allow bootp;
allow booting;

next-server 192.168.1.150;

if option system-arch = 00:0b {
    filename "snp-arm64.efi";
} else {
    filename "snp.efi";
}

host talos-mgmt-0 {
    fixed-address 192.168.254.2;
    hardware ethernet d0:50:99:d3:33:60;
}
Notice that it sets a static address for the management node that I’ll be booting, in addition to providing the “next server” info.
This “next server” IP address will match references to PUBLIC_IP found below in this guide.
Create a Local Cluster
The talosctl CLI tool has built-in support for spinning up Talos in docker containers.
Let’s use this to our advantage as an easy Kubernetes cluster to start from.
Set an environment variable called PUBLIC_IP which is the “public” IP of your machine.
Note that “public” is a bit of a misnomer.
We’re really looking for the IP of your machine, not the IP of the node on the docker bridge (ex: 192.168.1.150).
export PUBLIC_IP="192.168.1.150"
We can now create our Docker cluster.
Issue the following to create a single-node cluster:
talosctl cluster create \
 --kubernetes-version 1.29.0 \
  -p 69:69/udp,8081:8081/tcp,51821:51821/udp \
  --workers 0 \
  --endpoint $PUBLIC_IP
Note that there are several ports mentioned in the command above.
These allow us to access the services that will get deployed on this node.
Once the cluster create command is complete, issue talosctl kubeconfig /desired/path to fetch the kubeconfig for this cluster.
You should then set your KUBECONFIG environment variable to the path of this file.
Untaint Control Plane
Because this is a single node cluster, we need to remove the “NoSchedule” taint on the node to make sure non-controlplane components can be scheduled.
kubectl taint node talos-default-controlplane-1 node-role.kubernetes.io/control-plane:NoSchedule-
Install Sidero
To install Sidero and the other Talos providers, simply issue:
SIDERO_CONTROLLER_MANAGER_HOST_NETWORK=true \
  SIDERO_CONTROLLER_MANAGER_DEPLOYMENT_STRATEGY=Recreate \
  SIDERO_CONTROLLER_MANAGER_API_ENDPOINT=$PUBLIC_IP \
  clusterctl init -b talos -c talos -i sidero
We will now want to ensure that the Sidero services that got created are publicly accessible across our subnet.
These variables above will allow the metal machines to speak to these services later.
Register the Servers
At this point, any servers on the same network as Sidero should PXE boot using the Sidero PXE service.
To register a server with Sidero, simply turn it on and Sidero will do the rest.
Once the registration is complete, you should see the servers registered with kubectl get servers:
$ kubectl get servers -o wide
NAME                                   HOSTNAME        ACCEPTED   ALLOCATED   CLEAN
00000000-0000-0000-0000-d05099d33360   192.168.254.2   false      false       false
Setting up IPMI
Sidero can use IPMI information to control Server power state, reboot servers and set boot order.
IPMI information will be, by default, setup automatically if possible as part of the acceptance process.
See IPMI for more information.
IPMI connection information can also be set manually in the Server spec after initial registration:
kubectl patch server 00000000-0000-0000-0000-d05099d33360 --type='json' -p='[{"op": "add", "path": "/spec/bmc", "value": {"endpoint": "192.168.88.9", "user": "ADMIN", "pass":"ADMIN"}}]'
If IPMI info is not set, servers should be configured to boot first from network, then from disk.
Configuring the installation disk
Note that for bare-metal setup, you would need to specify an installation disk.
See Installation Disk for details on how to do this.
You should configure this before accepting the server.
Accept the Servers
Note in the output above that the newly registered servers are not accepted.
In order for a server to be eligible for consideration, it must be marked as accepted.
Before a Server is accepted, no write action will be performed against it.
Servers can be accepted by issuing a patch command like:
kubectl patch server 00000000-0000-0000-0000-d05099d33360 --type='json' -p='[{"op": "replace", "path": "/spec/accepted", "value": true}]'
For more information on server acceptance, see the server docs.
Create Management Plane
We are now ready to template out our management plane.
Using clusterctl, we can create a cluster manifest with:
clusterctl generate cluster management-plane -i sidero > management-plane.yaml
Note that there are several variables that should be set in order for the templating to work properly:
CONTROL_PLANE_ENDPOINT and CONTROL_PLANE_PORT: The endpoint (IP address or hostname) and the port used for the Kubernetes API server
(e.g. for https://1.2.3.4:6443: CONTROL_PLANE_ENDPOINT=1.2.3.4 and CONTROL_PLANE_PORT=6443).
This is the equivalent of the endpoint you would specify in talosctl gen config.
There are a variety of ways to configure a control plane endpoint.
Some common ways for an HA setup are to use DNS, a load balancer, or BGP.
A simpler method is to use the IP of a single node.
This has the disadvantage of being a single point of failure, but it can be a simple way to get running.CONTROL_PLANE_SERVERCLASS: The server class to use for control plane nodes.WORKER_SERVERCLASS: The server class to use for worker nodes.KUBERNETES_VERSION: The version of Kubernetes to deploy (e.g. v1.29.0).CONTROL_PLANE_PORT: The port used for the Kubernetes API server (port 6443)TALOS_VERSION: This should correspond to the minor version of Talos that you will be deploying (e.g. v1.6.1).
This value is used in determining the fields present in the machine configuration that gets generated for Talos nodes.
For instance:
export CONTROL_PLANE_SERVERCLASS=any
export WORKER_SERVERCLASS=any
export TALOS_VERSION=v1.6.1
export KUBERNETES_VERSION=v1.29.0
export CONTROL_PLANE_PORT=6443
export CONTROL_PLANE_ENDPOINT=1.2.3.4
clusterctl generate cluster management-plane -i sidero > management-plane.yaml
In addition, you can specify the replicas for control-plane & worker nodes in management-plane.yaml manifest for TalosControlPlane and MachineDeployment objects.
Also, they can be scaled if needed (after applying the management-plane.yaml manifest):
kubectl get taloscontrolplane
kubectl get machinedeployment
kubectl scale taloscontrolplane management-plane-cp --replicas=3
Now that we have the manifest, we can simply apply it:
kubectl apply -f management-plane.yaml
NOTE: The templated manifest above is meant to act as a starting point.
If customizations are needed to ensure proper setup of your Talos cluster, they should be added before applying.
Once the management plane is setup, you can fetch the talosconfig by using the cluster label.
Be sure to update the cluster name and issue the following command:
kubectl get talosconfig \
  -l cluster.x-k8s.io/cluster-name=<CLUSTER NAME> \
  -o yaml -o jsonpath='{.items[0].status.talosConfig}' > management-plane-talosconfig.yaml
With the talosconfig in hand, the management plane’s kubeconfig can be fetched with talosctl --talosconfig management-plane-talosconfig.yaml kubeconfig
Pivoting
Once we have the kubeconfig for the management cluster, we now have the ability to pivot the cluster from our bootstrap.
Using clusterctl, issue:
clusterctl init --kubeconfig=/path/to/management-plane/kubeconfig -i sidero -b talos -c talos
Followed by:
clusterctl move --to-kubeconfig=/path/to/management-plane/kubeconfig
Upon completion of this command, we can now tear down our bootstrap cluster with talosctl cluster destroy and begin using our management plane as our point of creation for all future clusters!.
4.2 - Building A Management Plane with ISO Image
A guide for bootstrapping Sidero management plane using the ISO image
This guide will provide some very basic detail about how you can also build a Sidero management plane using the Talos ISO image instead of following the Docker-based process that we detail in our Getting Started tutorials.
Using the ISO is a perfectly valid way to build a Talos cluster, but this approach is not recommended for Sidero as it avoids the “pivot” step detailed here.
Skipping this step means that the management plane does not become “self-hosted”, in that it cannot be upgraded and scaled using the Sidero processes we follow for workload clusters.
For folks who are willing to take care of their management plane in other ways, however, this approach will work fine.
The rough outline of this process is very short and sweet, as it relies on other documentation:
-
For each management plane node, boot the ISO and install Talos using the “apply-config” process mentioned in our Talos Getting Started docs.
These docs go into heavy detail on using the ISO, so they will not be recreated here.
-
With a Kubernetes cluster now in hand (and with access to it via talosctl and kubectl), you can simply pickup the Getting Started tutorial at the “Install Sidero” section here.
Keep in mind, however, that you will be unable to do the “pivoting” section of the tutorial, so just skip that step when you reach the end of the tutorial.
Note: It may also be of interest to view the prerequisite guides on CLI and DHCP setup, as they will still apply to this method.
- For long-term maintenance of a management plane created in this way, refer to the Talos documentation for upgrading Kubernetes and Talos itself.
4.3 - Decommissioning Servers
A guide for decommissioning servers
This guide will detail the process for removing a server from Sidero.
The process is fairly simple with a few pieces of information.
-
For the given server, take note of any serverclasses that are configured to match the server.
-
Take note of any clusters that make use of aforementioned serverclasses.
-
For each matching cluster, edit the cluster resource with kubectl edit cluster and set .spec.paused to true.
Doing this ensures that no new machines will get created for these servers during the decommissioning process.
-
If you want to mark a server to be not allocated after it’s accepted into the cluster, set the .spec.cordoned field to true.
This will prevent the server from being allocated to any new clusters (still allowing it to be wiped).
-
If the server is already part of a cluster (kubectl get serverbindings -o wide should provide this info), you can now delete the machine that corresponds with this server via kubectl delete machine <machine_name>.
-
With the machine deleted, Sidero will reboot the machine and wipe its disks.
-
Once the disk wiping is complete and the server is turned off, you can finally delete the server from Sidero with kubectl delete server <server_name> and repurpose the server for something else.
-
Finally, unpause any clusters that were edited in step 3 by setting .spec.paused to false.
4.4 - Creating Your First Cluster
A guide for creating your first cluster with the Sidero management plane
Introduction
This guide will detail the steps needed to provision your first bare metal Talos cluster after completing the bootstrap and pivot steps detailed in the previous guide.
There will be two main steps in this guide: reconfiguring the Sidero components now that they have been pivoted and the actual cluster creation.
Patch Services
In this guide, we will convert the services to use host networking.
This is also necessary because some protocols like TFTP don’t allow for port configuration.
Along with some nodeSelectors and a scale up of the metal controller manager deployment, creating the services this way allows for the creation of DNS names that point to all management plane nodes and provide an HA experience if desired.
It should also be noted, however, that there are many options for achieving this functionality.
Users can look into projects like MetalLB or KubeRouter with BGP and ECMP if they desire something else.
Metal Controller Manager:
## Use host networking
kubectl patch deploy -n sidero-system sidero-controller-manager --type='json' -p='[{"op": "add", "path": "/spec/template/spec/hostNetwork", "value": true}]'
Update Environment
Sidero by default appends talos.config kernel argument with based on the flags --api-endpoint and --api-port to the sidero-controller-manager:
talos.config=http://$API_ENDPOINT:$API_PORT/configdata?uuid=.
If this default value doesn’t apply, edit the environment with kubectl edit environment default and add the talos.config kernel arg with the IP of one of the management plane nodes (or the DNS entry you created).
Update DHCP
The DHCP options configured in the previous guide should now be updated to point to your new management plane IP or to the DNS name if it was created.
A revised ipxe-metal.conf file looks like:
allow bootp;
allow booting;

next-server 192.168.254.2;
if exists user-class and option user-class = "iPXE" {
  filename "http://192.168.254.2:8081/boot.ipxe";
} else {
  if substring (option vendor-class-identifier, 15, 5) = "00000" {
    # BIOS
    if substring (option vendor-class-identifier, 0, 10) = "HTTPClient" {
      option vendor-class-identifier "HTTPClient";
      filename "http://192.168.254.2:8081/tftp/undionly.kpxe";
    } else {
      filename "undionly.kpxe";
    }
  } else {
    # UEFI
    if substring (option vendor-class-identifier, 0, 10) = "HTTPClient" {
      option vendor-class-identifier "HTTPClient";
      filename "http://192.168.254.2:8081/tftp/snp.efi";
    } else {
      filename "snp.efi";
    }
  }
}

host talos-mgmt-0 {
   fixed-address 192.168.254.2;
   hardware ethernet d0:50:99:d3:33:60;
}
There are multiple ways to boot the via iPXE:
- if the node has built-in iPXE, direct URL to the iPXE script can be used:
http://192.168.254.2:8081/boot.ipxe. - depending on the boot mode (BIOS or UEFI), either
snp.efi or undionly.kpxe can be used (these images contain embedded iPXE scripts). - iPXE binaries can be delivered either over TFTP or HTTP (HTTP support depends on node firmware).
Register the Servers
At this point, any servers on the same network as Sidero should PXE boot using the Sidero PXE service.
To register a server with Sidero, simply turn it on and Sidero will do the rest.
Once the registration is complete, you should see the servers registered with kubectl get servers:
$ kubectl get servers -o wide
NAME                                   HOSTNAME        ACCEPTED   ALLOCATED   CLEAN
00000000-0000-0000-0000-d05099d33360   192.168.254.2   false      false       false
Accept the Servers
Note in the output above that the newly registered servers are not accepted.
In order for a server to be eligible for consideration, it must be marked as accepted.
Before a Server is accepted, no write action will be performed against it.
Servers can be accepted by issuing a patch command like:
kubectl patch server 00000000-0000-0000-0000-d05099d33360 --type='json' -p='[{"op": "replace", "path": "/spec/accepted", "value": true}]'
For more information on server acceptance, see the server docs.
Create the Cluster
The cluster creation process should be identical to what was detailed in the previous guide.
Using clusterctl, we can create a cluster manifest with:
clusterctl generate cluster workload-cluster -i sidero > workload-cluster.yaml
Note that there are several variables that should be set in order for the templating to work properly:
CONTROL_PLANE_ENDPOINT and CONTROL_PLANE_PORT: The endpoint (IP address or hostname) and the port used for the Kubernetes API server
(e.g. for https://1.2.3.4:6443: CONTROL_PLANE_ENDPOINT=1.2.3.4 and CONTROL_PLANE_PORT=6443).
This is the equivalent of the endpoint you would specify in talosctl gen config.
There are a variety of ways to configure a control plane endpoint.
Some common ways for an HA setup are to use DNS, a load balancer, or BGP.
A simpler method is to use the IP of a single node.
This has the disadvantage of being a single point of failure, but it can be a simple way to get running.CONTROL_PLANE_SERVERCLASS: The server class to use for control plane nodes.WORKER_SERVERCLASS: The server class to use for worker nodes.KUBERNETES_VERSION: The version of Kubernetes to deploy (e.g. v1.19.4).TALOS_VERSION: This should correspond to the minor version of Talos that you will be deploying (e.g. v0.10).
This value is used in determining the fields present in the machine configuration that gets generated for Talos nodes.
Note that the default is currently v0.13.
Now that we have the manifest, we can simply apply it:
kubectl apply -f workload-cluster.yaml
NOTE: The templated manifest above is meant to act as a starting point.
If customizations are needed to ensure proper setup of your Talos cluster, they should be added before applying.
Once the workload cluster is setup, you can fetch the talosconfig with a command like:
kubectl get talosconfig -o yaml workload-cluster-cp-xxx -o jsonpath='{.status.talosConfig}' > workload-cluster-talosconfig.yaml
Then the workload cluster’s kubeconfig can be fetched with talosctl --talosconfig workload-cluster-talosconfig.yaml kubeconfig /desired/path.
4.5 - Patching
A guide describing patching
Server resources can be updated by using the configPatches section of the custom resource.
Any field of the Talos machine config
can be overridden on a per-machine basis using this method.
The format of these patches is based on JSON 6902 that you may be used to in tools like kustomize.
Any patches specified in the server resource are processed by the Sidero controller before it returns a Talos machine config for a given server at boot time.
A set of patches may look like this:
apiVersion: metal.sidero.dev/v1alpha2
kind: Server
metadata:
  name: 00000000-0000-0000-0000-d05099d33360
spec:
  configPatches:
    - op: replace
      path: /machine/install
      value:
        disk: /dev/sda
    - op: replace
      path: /cluster/network/cni
      value:
        name: "custom"
        urls:
          - "http://192.168.1.199/assets/cilium.yaml"
Testing Configuration Patches
While developing config patches it is usually convenient to test generated config with patches
before actual server is provisioned with the config.
This can be achieved by querying the metadata server endpoint directly:
$ curl http://$PUBLIC_IP:8081/configdata?uuid=$SERVER_UUID
version: v1alpha1
...
Replace $PUBLIC_IP with the Sidero IP address and $SERVER_UUID with the name of the Server to test
against.
If metadata endpoint returns an error on applying JSON patches, make sure config subtree being patched exists in the config.
If it doesn’t exist, create it with the op: add above the op: replace patch.
Combining Patches from Multiple Sources
Config patches might be combined from multiple sources (Server, ServerClass, TalosControlPlane, TalosConfigTemplate), which is explained in details
in Metadata section.
4.6 - Provisioning Flow
Diagrams for various flows in Sidero.
graph TD;
    Start(Start);
    End(End);

    %% Decisions

    IsOn{Is server is powered on?};
    IsRegistered{Is server is registered?};
    IsAccepted{Is server is accepted?};
    IsClean{Is server is clean?};
    IsAllocated{Is server is allocated?};

    %% Actions

    DoPowerOn[Power server on];
    DoPowerOff[Power server off];
    DoBootAgentEnvironment[Boot agent];
    DoBootEnvironment[Boot environment];
    DoRegister[Register server];
    DoWipe[Wipe server];

    %% Chart

    Start-->IsOn;
    IsOn--Yes-->End;
    IsOn--No-->DoPowerOn;

    DoPowerOn--->IsRegistered;

    IsRegistered--Yes--->IsAccepted;
    IsRegistered--No--->DoBootAgentEnvironment-->DoRegister;

    DoRegister-->IsRegistered;

    IsAccepted--Yes--->IsAllocated;
    IsAccepted--No--->End;

    IsAllocated--Yes--->DoBootEnvironment;
    IsAllocated--No--->IsClean;
    IsClean--No--->DoWipe-->DoPowerOff;

    IsClean--Yes--->DoPowerOff;

    DoBootEnvironment-->End;

    DoPowerOff-->End;
Installation Flow
graph TD;
    Start(Start);
    End(End);

    %% Decisions

    IsInstalled{Is installed};

    %% Actions

    DoInstall[Install];
    DoReboot[Reboot];

    %% Chart

    Start-->IsInstalled;
    IsInstalled--Yes-->End;
    IsInstalled--No-->DoInstall;

    DoInstall-->DoReboot;

    DoReboot-->IsInstalled;
4.7 - Raspberry Pi4 as Servers
Using Raspberrypi Pi 4 as servers
This guide will explain on how to use Sidero to manage Raspberrypi-4’s as
servers.
This guide goes hand in hand with the bootstrapping
guide.
From the bootstrapping guide, reach “Install Sidero” and come back to this
guide.
Once you finish with this guide, you will need to go back to the
bootstrapping guide and continue with “Register the servers”.
The rest of this guide goes with the assumption that you’ve a cluster setup with
Sidero and ready to accept servers.
This guide will explain the changes that needs to be made to be able to accept RPI4 as server.
RPI4 boot process
To be able to boot talos on the Pi4 via network, we need to undergo a 2-step boot process.
The Pi4 has an EEPROM which contains code to boot up the Pi.
This EEPROM expects a specific boot folder structure as explained on
this page.
We will use the EEPROM to boot into UEFI, which we will then use to PXE and iPXE boot into sidero & talos.
Prerequisites
Update EEPROM
NOTE: If you’ve updated the EEPROM with the image that was referenced on the talos docs,
you can either flash it with the one mentioned below, or visit the EEPROM config docs
and change the boot order of EEPROM to 0xf21.
Which means try booting from SD first, then try network.
To enable the EEPROM on the Pi to support network booting, we must update it to
the latest version.
Visit the release page and grab the
latest rpi-boot-eeprom-recovery-*-network.zip (as of time of writing,
v2021.0v.29-138a1 was used).
Put this on a SD card and plug it into the Pi.
The
Pi’s status light will flash rapidly after a few seconds, this indicates that
the EEPROM has been updated.
This operation needs to be done once per Pi.
Serial number
Power on the Pi without an SD card in it and hook it up to a monitor, you will
be greeted with the boot screen.
On this screen you will find some information
about the Pi.
For this guide, we are only interested in the serial number.
The
first line under the Pi logo will be something like the following:
board: xxxxxx <serial> <MAC address>
Write down the 8 character serial.
talos-systems/pkg
Clone the talos-systems/pkg repo.
Create a new folder called raspberrypi4-uefi and raspberrypi4-uefi/serials.
Create a file raspberrypi4-uefi/pkg.yaml containing the following:
name: raspberrypi4-uefi
variant: alpine
install:
  - unzip
steps:
# {{ if eq .ARCH "aarch64" }} This in fact is YAML comment, but Go templating instruction is evaluated by bldr restricting build to arm64 only
  - sources:
      - url: https://github.com/pftf/RPi4/releases/download/v1.26/RPi4_UEFI_Firmware_v1.26.zip # <-- update version NR accordingly.
        destination: RPi4_UEFI_Firmware.zip
        sha256: d6db87484dd98dfbeb64eef203944623130cec8cb71e553eab21f8917e0285f7
        sha512: 96a71086cdd062b51ef94726ebcbf15482b70c56262555a915499bafc04aff959d122410af37214760eda8534b58232a64f6a8a0a8bb99aba6de0f94c739fe98
    prepare:
      - |
        unzip RPi4_UEFI_Firmware.zip
        rm RPi4_UEFI_Firmware.zip
        mkdir /rpi4
        mv ./* /rpi4
    install:
      - |
        mkdir /tftp
        ls /pkg/serials | while read serial; do mkdir /tftp/$serial && cp -r /rpi4/* /tftp/$serial && cp -r /pkg/serials/$serial/* /tftp/$serial/; done
# {{ else }}
  - install:
      - |
                mkdir -p /tftp
# {{ end }}
finalize:
  - from: /
    to: /
UEFI / RPi4
Now that the EEPROM can network boot, we need to prepare the structure of our
boot folder.
Essentially what the bootloader will do is look for this folder
on the network rather than on the SD card.
Visit the release page of RPi4 and grab
the latest RPi4_UEFI_Firmware_v*.zip (at the time of writing, v1.26 was used).
Extract the zip into a folder, the structure will look like the following:
.
├── RPI_EFI.fd
├── RPi4_UEFI_Firmware_v1.26.zip
├── Readme.md
├── bcm2711-rpi-4-b.dtb
├── bcm2711-rpi-400.dtb
├── bcm2711-rpi-cm4.dtb
├── config.txt
├── firmware
│   ├── LICENCE.txt
│   ├── Readme.txt
│   ├── brcmfmac43455-sdio.bin
│   ├── brcmfmac43455-sdio.clm_blob
│   └── brcmfmac43455-sdio.txt
├── fixup4.dat
├── overlays
│   └── miniuart-bt.dtbo
└── start4.elf
As a one time operation, we need to configure UEFI to do network booting by
default, remove the 3gb mem limit if it’s set and optionally set the CPU clock to
max.
Take these files and put them on the SD card and boot the Pi.
You will see the Pi logo, and the option to hit esc.
Remove 3GB mem limit
- From the home page, visit “Device Manager”.
- Go down to “Raspberry Pi Configuration” and open that menu.
- Go to “Advanced Configuration”.
- Make sure the option “Limit RAM to 3 GB” is set to
Disabled.
Change CPU to Max (optionally)
- From the home page, visit “Device Manager”.
- Go down to “Raspberry Pi Configuration” and open that menu.
- Go to “CPU Configuration”.
- Change CPU clock to
Max.
Change boot order
- From the home page, visit “Boot Maintenance Manager”.
- Go to “Boot Options”.
- Go to “Change Boot Order”.
- Make sure that
UEFI PXEv4 is the first boot option.
Persisting changes
Now that we have made the changes above, we need to persist these changes.
Go back to the home screen and hit reset to save the changes to disk.
When you hit reset, the settings will be saved to the RPI_EFI.fd file on the
SD card.
This is where we will run into a limitation that is explained in the
following issue: pftf/RPi4#59.
What this mean is that we need to create a RPI_EFI.fd file for each Pi that we want to use as server.
This is because the MAC address is also stored in the RPI_EFI.fd file,
which makes it invalid when you try to use it in a different Pi.
Plug the SD card back into your computer and extract the RPI_EFI.fd file from
it and place it into the raspberrypi4-uefi/serials/<serial>/.
The dir should look like this:
raspberrypi4-uefi/
├── pkg.yaml
└── serials
    └─── XXXXXXXX
        └── RPI_EFI.fd
Build the image with the boot folder contents
Now that we have the RPI_EFI.fd of our Pi in the correct location, we must now
build a docker image containing the boot folder for the EEPROM.
To do this, run the following command in the pkgs repo:
make PLATFORM=linux/arm64 USERNAME=$USERNAME PUSH=true TARGETS=raspberrypi4-uefi
This will build and push the following image:
ghcr.io/$USERNAME/raspberrypi4-uefi:<tag>
If you need to change some other settings like registry etc, have a look in the
Makefile to see the available variables that you can override.
The content of the /tftp folder in the image will be the following:
XXXXXXXX
├── RPI_EFI.fd
├── Readme.md
├── bcm2711-rpi-4-b.dtb
├── bcm2711-rpi-400.dtb
├── bcm2711-rpi-cm4.dtb
├── config.txt
├── firmware
│   ├── LICENCE.txt
│   ├── Readme.txt
│   ├── brcmfmac43455-sdio.bin
│   ├── brcmfmac43455-sdio.clm_blob
│   └── brcmfmac43455-sdio.txt
├── fixup4.dat
├── overlays
│   └── miniuart-bt.dtbo
└── start4.elf
To enable the 2 boot process, we need to include this EEPROM boot folder into
the sidero’s tftp folder.
To achieve this, we will use an init container using
the image we created above to copy the contents of it into the tftp folder.
Create a file patch.yaml with the following contents:
spec:
  template:
    spec:
      volumes:
        - name: tftp-folder
          emptyDir: {}
      initContainers:
      - image: ghcr.io/<USER>/raspberrypi4-uefi:v<TAG> # <-- change accordingly.
        imagePullPolicy: Always
        name: tftp-folder-setup
        command:
          - cp
        args:
          - -r
          - /tftp
          - /var/lib/sidero/
        volumeMounts:
          - mountPath: /var/lib/sidero/tftp
            name: tftp-folder
      containers:
      - name: manager
        volumeMounts:
          - mountPath: /var/lib/sidero/tftp
            name: tftp-folder
Followed by this command to apply the patch:
kubectl -n sidero-system patch deployments.apps sidero-controller-manager --patch "$(cat patch.yaml)"
By default, Sidero will use iPXE’s exit command to attempt to force boot from disk.
On Raspberry Pi, this will drop you into the bootloader interface, and you will need to connect a keyboard and manually select the disk to boot from.
The BootFromDiskMethod can be configured on individual Servers, on ServerClasses, or as a command-line argument to the Sidero metal controller itself (--boot-from-disk-method=<value>).
In order to force the Pi to use the configured bootloader order, the BootFromDiskMethod needs to be set to ipxe-sanboot.
Profit
With the patched metal controller, you should now be able to register the Pi4 to
sidero by just connecting it to the network.
From this point you can continue with the bootstrapping guide.
4.8 - Sidero on Raspberry Pi 4
Running Sidero on Raspberry Pi 4 to provision bare-metal servers.
Sidero doesn’t require a lot of computing resources, so SBCs are a perfect fit to run
the Sidero management cluster.
In this guide, we are going to install Talos on Raspberry Pi4, deploy Sidero and other CAPI components.
Prerequisites
Please see Talos documentation for additional information on installing Talos on Raspberry Pi4.
Download the clusterctl CLI from CAPI releases.
The minimum required version is 1.5.0.
Installing Talos
Prepare the SD card with the Talos RPi4 image, and boot the RPi4.
Talos should drop into maintenance mode printing the acquired IP address.
Record the IP address as the environment variable SIDERO_ENDPOINT:
export SIDERO_ENDPOINT=192.168.x.x
Note: it makes sense to transform DHCP lease for RPi4 into a static reservation so that RPi4 always has the same IP address.
Generate Talos machine configuration for a single-node cluster:
talosctl gen config --config-patch='[{"op": "add", "path": "/cluster/allowSchedulingOnControlPlanes", "value": true},{"op": "replace", "path": "/machine/install/disk", "value": "/dev/mmcblk0"}]' rpi4-sidero https://${SIDERO_ENDPOINT}:6443/
Submit the generated configuration to Talos:
talosctl apply-config --insecure -n ${SIDERO_ENDPOINT} -f controlplane.yaml
Merge client configuration talosconfig into default ~/.talos/config location:
talosctl config merge talosconfig
Update default endpoint and nodes:
talosctl config endpoints ${SIDERO_ENDPOINT}
talosctl config nodes ${SIDERO_ENDPOINT}
You can verify that Talos has booted by running:
$ talosctl version
talosctl version
Client:
    Tag:         v0.10.3
    SHA:         21018f28
    Built:
    Go version:  go1.16.3
    OS/Arch:     linux/amd64

Server:
    NODE:        192.168.0.31
    Tag:         v0.10.3
    SHA:         8f90c6a8
    Built:
    Go version:  go1.16.3
    OS/Arch:     linux/arm64
Bootstrap the etcd cluster:
At this point, Kubernetes is bootstrapping, and it should be available once all the images are fetched.
Fetch the kubeconfig from the cluster with:
You can watch the bootstrap progress by running:
Once Talos prints [talos] boot sequence: done, Kubernetes should be up:
Installing Sidero
Install Sidero with host network mode, exposing the endpoints on the node’s address:
SIDERO_CONTROLLER_MANAGER_HOST_NETWORK=true SIDERO_CONTROLLER_MANAGER_DEPLOYMENT_STRATEGY=Recreate SIDERO_CONTROLLER_MANAGER_API_ENDPOINT=${SIDERO_IP} clusterctl init -i sidero -b talos -c talos
Watch the progress of installation with:
watch -n 2 kubectl get pods -A
Once images are downloaded, all pods should be in running state:
$ kubectl get pods -A
NAMESPACE             NAME                                         READY   STATUS    RESTARTS   AGE
cabpt-system          cabpt-controller-manager-6458494888-d7lnm    1/1     Running   0          29m
cacppt-system         cacppt-controller-manager-f98854db8-qgkf9    1/1     Running   0          29m
capi-system           capi-controller-manager-58f797cb65-8dwpz     2/2     Running   0          30m
capi-webhook-system   cabpt-controller-manager-85fd964c9c-ldzb6    1/1     Running   0          29m
capi-webhook-system   cacppt-controller-manager-75c479b7f-5hw89    1/1     Running   0          29m
capi-webhook-system   capi-controller-manager-7d596cc4cb-kjrfk     2/2     Running   0          30m
capi-webhook-system   caps-controller-manager-79664cf677-zqbvw     1/1     Running   0          29m
cert-manager          cert-manager-86cb5dcfdd-v86wr                1/1     Running   0          31m
cert-manager          cert-manager-cainjector-84cf775b89-swk25     1/1     Running   0          31m
cert-manager          cert-manager-webhook-7f9f4f8dcb-29xm4        1/1     Running   0          31m
kube-system           coredns-fcc4c97fb-wkxkg                      1/1     Running   0          35m
kube-system           coredns-fcc4c97fb-xzqzj                      1/1     Running   0          35m
kube-system           kube-apiserver-talos-192-168-0-31            1/1     Running   0          33m
kube-system           kube-controller-manager-talos-192-168-0-31   1/1     Running   0          33m
kube-system           kube-flannel-qmlw6                           1/1     Running   0          34m
kube-system           kube-proxy-j24hg                             1/1     Running   0          34m
kube-system           kube-scheduler-talos-192-168-0-31            1/1     Running   0          33m
Verify Sidero installation and network setup with:
$ curl -I http://${SIDERO_ENDPOINT}:8081/tftp/ipxe.efi
HTTP/1.1 200 OK
Accept-Ranges: bytes
Content-Length: 1020416
Content-Type: application/octet-stream
Last-Modified: Thu, 03 Jun 2021 15:40:58 GMT
Date: Thu, 03 Jun 2021 15:41:51 GMT
Now Sidero is installed, and it is ready to be used.
Configure your DHCP server to PXE boot your bare metal servers from $SIDERO_ENDPOINT (see Bootstrapping guide on DHCP configuration).
Backup and Recovery
SD cards are not very reliable, so make sure you are taking regular etcd backups,
so that you can recover your Sidero installation in case of data loss.